Papastew.co.uk - Title Banner

Walkthrough

Final Fantasy VII - Walkthrough

Disc One


Midgar

Sector 1 Station

Mako Reactor 1:


[Items to find: Potion (3), Phoenix Down, Restore Materia]


Following the opening cutscene, Cloud will jump off the train and you will be in control. 


Check the two knocked out guards in red (A) to obtain a Potion from each.  There is a fight with 2 soldiers but this is not an issue.


Exit via (1)


Head north and walk up to the group of people for a small scene where you will have the opportunity to name 2 characters; [Cloud] & [Barret].


From here onwards, this guide will refer to all characters by their default names.


Follow the path to the right, under the flashing sign, to get around to the door in the north-west corner.

FF7 Sector 1 Control Room

You are now on the gangway leading into the reactor, head left then up into the door (You can talk to Wedge, but doesn't give you anything).


You are now in the control room, walk up to Barret and he will join your party. Talk to Biggs by the first door and he will open it, follow them and then speak to Jessie to open the next door.


Before following Jessie, take a right and you will find a Phoenix Down in a box (B).


Go back and talk to Jessie again to enter the elevator. Press the button on the back wall and a small scene will play. 


Exit the elevator and follow Jessie down the stairs to the left all the way to the bottom and enter the door.

FF7 Sector 1 Reactor Ladders

Walk forwards towards Jessie and you will jump over to her. Talk to her to learn that you have to press (OK) to jump onto a ladder and press a direction to move up or down.


Climb down the first ladder and walk along the beam. Collect the Potion (C) and then continue down the ladders to the exit at the bottom.


There is only one way down, follow the pipe to the ladder and climb down.


This is your first opportunity to [Save]. Open the menu and select [Save] to save your progress.


Head right along the walkway to the reactor.

FF7 Sector 1 Reactor

On the walkway is a small orb (D), this is the first of many Materia you will be collecting on your journey. In this case it is the Restore Materia, but you will not be able to equip it just yet.


Walk up to the reactor for a scene the play and a Boss Fight.

- - - - - - - - - - - - - - - - - - - - - - - - - - - - - - -


Collect the loot (Assault Gun) and equip it to Barret.


After the Boss Fight, leave the same way you came in, but you have 10 minutes to escape. On the way out, you will see Jessie, talk to her to help her get her leg un-stuck.


When you get back up to the control room, talk to Jessie to unlock the door, then Biggs to unlock the second door. Finally exit the reactor.

Tips:


This boss is fairly easy but, if you don't watch yourself, it can deal significant damage.


Have Cloud use Bolt and attack normally with Barret; if you have a Limit Break, use it.


When it raises its tail; STOP ATTACKING. Wait for the tail to go back down before commencing attacks.

Boss Fight: Guard Scorpion (Level: 12)

Statistics
HP MP Attack Mag
Attack
Def Mag
Def
Dex
800 0 30 15 40 256 60
Elemental Affinity
Fire Ice Lightning
100% 100% 200%
Earth Poison Gravity
100% 100% 0%
Water Wind Holy
100% 100% 100%
Rewards
Items Gil EXP AP
Assault Gun (Weapon) 100 100 10
Other Details
Morph Attacks Steal
None Search Scope, Scorpion Tail, Rifle Tail & Tail Laser (When tail is up (counterattack)) None

FF7 Sector 8 Aeris Meeting

Sector 8 & Sector 7 Slums:


[Items to find: Potion, All Materia, Ether]

[Quest Options: Gold Saucer Date]


After the escape, a scene will play out and Barret will order everyone to meet at Sector 8 Station. Follow Barret up the stairs and out.


On the next screen we will be spoken to by a flower girl named [Aeris]. Buy a flower from her.


Once the conversation is done, follow Aeris off screen to a Plaza.

FF7 Sector 8 Courtyard

In the Plaza, there is not much to do; you can talk to people but your goal is to just run south and leave. Remember to pick up the Potion (A) before you leave.


On the next screen, move south and you will be given the option to Fight the enemy or Run, you will get this option a few times as you go through the screen but in the end you will be surrounded and a scene will play where Cloud jumps off the bridge onto a moving train.


After the scene, follow the others into the next car. Walk towards the front and speak to everyone for more back-story; Jessie will give information about the city of Midgar and the upper and lower areas. Dating Choice.


Following this, a scene plays and you exit the train at Sector 7.


Walk up to Barret and then follow the group out of the station and into the slums. On the next screen, there is a boy at the top of the screen you can talk to for a bit more narrative but you want to go left where the others went.


Barret will enter the bar and kick everyone out; Talk to Barret and enter the bar. Upon entering, a scene will play where another choice can be made that affects the Dating section later on. Dating Choice.


Talk to the group then go to leave, Barret will charge in and tell you to meet him underground. Before following Barret, talk to Tifa at the bar and there is a further choice for the Dating section. Dating Choice. Walk up to the pinball machine and press (OK).


You can talk to the group again but walk up to Barret for a scene. Afterwards, go to walk away and Tifa will come in, get back on the Pinball machine and press (OK) to go back up. Go to leave and another scene will play in which another Dating choice is given. Dating Choice.


Finally, another scene plays and you wake up in the secret room below the bar.

FF7 Sector 7 Slums

Go up the pinball machine elevator and speak to Tifa for another Dating choice and then speak to Barret. Dating Choice. He will tell you about the next mission to Mako Reactor 5 and ask about Materia; you can choose to view the tutorial or to ignore it (Option 1 and 2 respectively).


Leave the bar and explore the town; (A) is the Item Shop, (B) is the Weapon Shop, (C) is a rest spot to restore health. Enter the Weapon shop and go upstairs to the (D) Beginner's Hall where some tutorials can be found. If you don't need tutorials, still come here for the free All Materia and Ether.


Tip: Buy some Iron Bangles and sell the Bronze ones from the Weapon Shop, get the All Materia and Ether from upstairs and open the menu. Select Materia and then Cloud; on his Buster Sword, place the Restore Materia and All Materia in the two slots as this will allow you to use Cure on all party members at once.


Once you have finished in the town, leave (3) and head to the train station.

Item Shop (A) Price
Potion 50 Gil
Phoenix Down 300 Gil
Antidote 80 Gil
Fire (Materia) 600 Gil
Ice (Materia) 600 Gil
Lightning (Materia) 600 Gil
Restore (Materia) 750 Gil
Weapon Shop (B) Price
Iron Bangle 160 Gil
Assault Gun 350 Gil
Grenade 80 Gil
Rest (C) Price
Boy's Room 10 Gil

FF7 Sector 5 Tunnels

Mako Reactor 5:


[Items to find: Phoenix Down, Hi-Potion, Ether (2), Potion, Tent]

[Quest Options: Gold Saucer Date]


Get on the train for a scene and then talk to Tifa. The alarm will go off early so you have to move from car to car.


In the first car, talk to the "Passenger" at the back to receive a Phoenix Down, in the second car, talk to the passenger nearest the front to receive a Hi-Potion. In the third car, there is a passenger that may steal an item for you and you can chase them to get it back but this takes time. Keep moving towards the front of the train.


In the last car, talk to Tifa, the group will then jump off the train (If you get trapped while moving in the train, Barret will blow the door up and you jump off early. Successfully dodging the security will affect the Dating section.


Move up the tunnel, at the end are Shinra's security lasers; on the left of the lasers is a panel, press (OK) on it to open it and choose to go into the tunnel.


In the tunnel, collect the Ether (A) and then exit.

FF7 Sector 4 Underground

Keep going down the ladders and you will arrive in a big room. There are 2 exits but both lead to the same place so it doesn't matter which you choose. You can talk to Wedge in the big room and Jessie in the room at the top of one of the two exits. There is also a Potion here opposite Jessie.


The two exits near Jessie lead to the big room and the one to the left lead to the reactor. Go down the ladder to the reactor.


In this room is a Save Point and an item called a Tent. You can use a Tent at a Save Point to restore HP/MP (I would save it for later). You can also talk to Biggs and exit via the ladder next to him. The rest of the way is the same as Reactor 1, use the slide to get to the bottom and follow the route you took in the previous mission.


Save before the reactor. Head into the reactor and a scene will play, once it is over, walk up to the reactor to plant the bomb. There is no time limit this time, head back the same way you exited the last reactor (Up the ladders, up the stairs (Not the slide you came down) and up the elevator).

FF7 Sector 5 Control Room

At the top of the elevator is the control room, collect the Ether (B) and enter the control room (C).


In order to ope the doors, you have to press the buttons at the same time as Barret and Tifa. This is quite easy to do, count the 3 and then tap (OK). 


Tip: It is worth saving the game and grinding a bit to get your Limit Breaks up for the next Boss Fight.


If you think you are ready, use the Tent at the save point, save and leave through the doors at the top.


Once outside, walk along the walkway and a scene plays followed by a Boss Fight.

Tips:


Watch out for Big Bomber and the Rear Gun as they can deal significant damage to you.


Attack when the Boss has its back to you as the back is weaker.


Cloud and Barret's LIMIT BREAKS can deal enough damage to end the fight in 1 turn.

Boss Fight: Airbuster (Level: 15)

Statistics
HP MP Attack Mag
Attack
Def Mag
Def
Dex
1200 0 24 12 80 320 75
Elemental Affinity
Fire Ice Lightning
100% 100% 200%
Earth Poison Gravity
0% 100% 0%
Water Wind Holy
100% 100% 100%
Rewards
Items Gil EXP AP
Titan Bangle (Armour) 150 180 16
Other Details
Morph Attacks Steal
None Big Bomber, Counter Attack & Rear Gun None

FF7 Aeris and Cloud Meeting

Sector 5 Slums:


[Items to find: Ether, Cover Materia, Potion, Phoenix Down]

[Quest Options: Gold Saucer Date, Turtle's Paradise]


Following the Boss fight, a scene will play where another Dating choice is made and Cloud will fall. Dating Choice.


After a short scene, Cloud will wake up in a Church with the Flower Girl from earlier. Talk to her a few times and engage in some conversation (Note: Options chosen in this conversation do not seem to have an effect on the Dating mechanics) and she will introduce herself as [Aeris]. Afterwards a man walks in and Aeris will stop talking, walk towards the man and Aeris will stop you. Talk to her again and she will ask you to be her bodyguard.


In the scene that follows, you will learn the name of the man, Reno. He is a member of a special force of Shinra, called the Turks.

FF7 Sector 5 Slums Barrels Puzzle

After another scene, Cloud and Aeris make their escape out the back of the church.


Once back in control, make your way up the stairs towards the top. Aeris will not jump over at one point and will be shot at and fall.


Climb to the top and be prepared to push some barrels. This is another part of the Dating mechanics, but in this walkthrough I will be giving the correct way to drop the barrels. Dating Choice.


Aeris will scream and then you get a choice, choose "Hold on a minute" and then press (OK) on barrel (1), each time she screams choose the same option and then barrels (2) followed by (3).


After this, Aeris will run up to join you at the top, exit the beams and then exit the roof via the hole in the roof on the left. Once outside, there will be a small scene and you will run off.


Run along the rooftops and you will finally get back to the ground.


Once on the ground, head West (There is a Save Point here). On the next screen the path splits, Heading right goes to the Sector 5 Slums and left towards Sector 6. The Sector 6 way is blocked so head to Sector 5 Slums.

FF7 Sector 5 Slums and Aeris' House

In town, talk to everyone for more narrative; there is a man in a tunnel who only moans, a Weapon Shop (A), Item Shop (B) and a Materia Shop (C). There is another house here, to the right of the Item Shop, inside is a man you can talk to, upstairs is a boy. He will mention something about his drawers. If you investigate the drawers, you will find 5 Gil. Don't take it, you will get something nicer later. On the wall is Turtle's Paradise Poster #1, read it and exit the room.


Once done here, head to (1)  and head to Aeris' house. In the garden, there are a couple of things to get; Cover Materia (D)  and an Ether (E).


Go into Aeris' house and a scene will play, it includes another Dating Choice. After the conversation; talk to Aeris' Mother, who will ask you to leave during the night to protect Aeris.


Go upstairs and a short scene will play. Once back in control, grab the package near the door (F) (Potion & Phoenix Down) and walk past Aeris' room (Do not run) or she will hear you.


Leave the house and head back towards the entrance to Sector 6. Aeris has somehow made it here before you though so she will accompany you to Sector 7. Sector 6 is a wreck, Head through the maze by going up the ramp, down the red beam, through the tunnel, around behind the red beam and up the wooden plank (Illustrated here). Leave this area and a scene will play where another Dating choice occurs. Dating Choice. Aeris will ask to take a break, follow and talk to her and the scene will play further.


After the scene, follow Aeris to Wall Market.

Item Shop (B) Price
Potion 50 Gil
Phoenix Down 300 Gil
Antidote 80 Gil
Tent 500 Gil
Weapon Shop (A) Price
Titan Bangle 280 Gil
Grenade 80 Gil
Materia Shop (C) Price
Fire 600 Gil
Ice 600 Gil
Lightning 600 Gil
Restore 750 Gil

Wall Market:


[Items to find: Ether, Hyper, Phoenix Down]
[Quest Options:
Gold Saucer Date]


When you enter the town, Aeris is looking around then tells you that we need to find Tifa.


Wall Market i s a large market town with many places to visit:

(A) Item Shop (1)

(B) Item Shop (2)

(C) Weapon Shop

(D) Materia Shop

(E) Inn

(F) Don Corneo's Mansion

(G) Dress Shop

(H) Tavern / Bar

(I) Gym

(J) Restaurant


Going right from Wall Market South leads to the Honey Bee Inn (2) , this is a club of suspect virtue ;) that is a centrepiece of the town. Item Shop (1) (A) is not worth visiting yet as it is only a broken machine with a gun in the ceiling that shoots at you when you try to use it.

Weapon Shop (C) Price
Mythril Rod 370 Gil
Metal Knuckles 320 Gil
Assault Gun 350 Gil
Titan Bangle 280 Gil
Mythril Armlet 350 Gil
Item Shop (B) Price
Potion 50 Gil
Phoenix Down 300 Gil
Antidote 80 Gil
Echo Screen 100 Gil
Eye Drop 50 Gil
Hyper 100 Gil
Tranquilizer 100 Gil
Hi-Potion 300 Gil
Tent 500 Gil
Materia Shop (D) Price
Fire 600 Gil
Ice 600 Gil
Lightning 600 Gil
Restore 750 Gil
Cover 1000 Gil
FF7 Wall Market Honey Bee Inn Outside

Head to The Honey Bee Inn (2) and talk to the man in the red waistcoat, mention Tifa and he will tell you that Tifa is at Don Corneo's Mansion (F). Head up there and talk to the doorman. A little scene plays where Aeris will suggest dressing up as a girl to gain access to the Mansion.


What you choose to use to dress up will change who catches the Don's eye later. The tables here show the items you can get and the * denotes the best item in the category.


As part of the Dating mechanics, whoever gets chosen later on will cause an effect along with the dialogue that follows it. Dating Choice.


Your first port of call is the dress shop (G) and talk to the person behind the counter. She says she can't give you a dress as her Dad makes them and he is at the bar. Head to the bar (H) and talk to the man at the front sitting by himself. Choose your dress specifications (See Dress Table) and leave. Head back to the Dress Shop and speak to the owner behind the bar to get your dress.

FF7 Wall Market Gym Squat Instructions

Now you need a wig, the Dress Shop owner says to go to the gym (I)  to get one. I would save before-hand if you are going for the best result with Don Corneo, just in case you lose the following challenge.


Inside the gym, talk to the trainer in front of the ring; you have to beat them at squats. Press [Switch], [Cancel] & [Confirm] in that order to do squats. Your timing has to be good, don't just mash the buttons, your aim is to press the next button as soon as the previous animation has finished or you will abort the squat.


Tip: You are given the opportunity to have a practice, if this is the first time doing this, I suggest the practice.


He will mess up a few times, so take advantage! Afterwards you will get the Blonde Wig if you win and the Wig if you lose.

Cologne Item
Sexy Cologne * Digestive
Flower Cologne Deodorant
Cologne Disinfectant
Dress Choice
Silk Dress * Soft and Shimmers
Satin Dress Soft and Shiny
Cotton Dress Clean and Soft/Shimmers
Tiara Gil Spent
Diamond Tiara * 200 Gil
Ruby Tiara 100 Gil
Tiara 50 Gil
Underwear Choice
Lingerie * The &$#% Room
Bikini Briefs The Group Room
Wig Condition
Blonde Wig * Win Squats
Dyed Wig Draw Squats
Wig Lose Squats
FF7 Wall Market Inn Vending Machine

Now you can either go straight to Don Corneo's Mansion from here or you can get more items to change the outcome of Don's choice. If you wish to proceed now, click here.


Next up is some cologne; go to the Bar and talk to the man standing at the back. He will tell you that someone is in the bathroom and has been for some time. Talk to the door and the occupant will ask for some medicine and you will get a cologne in exchange; for this you will need the Pharmacy Coupon. 


Head to the Restaurant (J) and purchase a meal. Head to the "Pharmacy" (B) and exchange the coupon for one of three items (See Cologne Table for details). Once you have the item, head back to the bar and give the item to the person in the toilet, you will then get your choice of cologne.


Now head to the Materia Shop and speak to the man behind the counter. He will ask for a favour, he wants you to stay at the Inn (E) and buy something from the vending machine. You will need 10 Gil for the room and Gil for the item (See Tiara Table for details) and give it to the Materia Store owner.

FF7 Wall Market Make-up Room

The final destination is the Honey Bee Inn. You need a membership pass to get in. Talk to the man wandering around in the bottom right corner of Wall Market South (just before the exit to the Honey Bee Inn) and he will give you his membership card. Now talk to the man outside the Honey Bee Inn and he will let you inside.


Once inside, the room you choose will give you a different item (See Underwear Table for details). Enter the room of your choice for some awkwardness and a reward.  The other two rooms are occupied, but you can peek through the keyholes if you want...

  • The Group Room is the bottom left. Talk to the lady in the bee costume to start the scene.
  • The &$#% Room is top left. Walk over to the faint blue and yellow thing and talk to it. After the scene, you have to quickly run to the girl in the Bee outfit and talk to her to get the Lingerie.

After you leave the room you chose, head to the top-most room and have the girl on the left put make-up on you.


Once you have your underwear and make-up, leave the Honey Bee Inn and walk towards Aeris.

FF7 Wall Market - Don Corneo's Mansion

Return to the Dress Shop and talk to the owner, walk to the dressing room at the back to get changed. Aeris will also get a dress for the infiltration into Don Corneo's Mansion.


Head up to the Mansion again and talk to the guard. He will let you in and after the receptionist leaves, head up the stairs and head to (3) and go down the stairs.


Walk towards Tifa and a scene will play, once back in control, walk past Tifa and Aeris and collect the Ether next to the furnace on the far left. Talk to Tifa for another short scene in which you need to talk to Tifa again.


Head back up the stairs and enter the Don's Office (2). Walk up to the desk and a scene will play where the Don will chose his "Bride for the night". Depending on what items you obtained, there is a chance that either Cloud, Tifa or Aeris is chosen and this will change the next series of events.

FF7 Wall Market Don's Bedroom

If Cloud is chosen:


Cloud will follow Don Corneo to his bedroom. When in control, go behind the bed to find a Hyper.


Talk to Don, in the conversation there is a Dating choice to make, but the conversation will loop if you choose certain answers. Dating Choice.


Finally, Cloud will reveal who he really is, Aeris and Tifa will come running in and another scene will play where each gets a chance to threaten Don Corneo's "Manhood". 


After, Aeris and Tifa will be standing at the end of the bed, join them there and another scene will play and you will be dropped into a trap door.

FF7 Wall Market Don Corneo's Henchmen's Room

If Tifa or Aeris is chosen:


You will be taken to the side room used by the guards and henchmen. There is a Phoenix Down in the right-most part of the room. Talk to Scotch at the back of the room and you will reveal who you are and you will have a couple of fights to do with just Cloud.


If Tifa was chosen, you have to get Aeris from the basement where you found Tifa earlier, another dating choice is made here. Dating Choice.


If Aeris was chosen, Tifa will join you when you leave the room, emerging from the basement; another dating choice is made here. Dating Choice.


Either way, enter the Don's Office (2) and head to the back, through the door to Don's bedroom. A scene will play where Don gets creepy and Cloud comes bursting in. After the scene, when you are back in control, go behind the bed to get a Hyper (A) then walk over to the girls. A scene will play and you will be dropped into a trap door.


Sewers and Train Graveyard:


[Items to find: Potion (3), Steal Materia, Hi-Potion (3), Echo Screen, Ether]
[Quest Options:
Gold Saucer Date]


After being dropped into the sewers, before talking to Aeris and Tifa, take some time to make sure you are battle-ready. Equip any weapons, armour, Materia etc. to your party. Who you talk to first will have an effect on the Dating choice. Dating Choice .


Tip: Consider giving Aeris the Fire Materia and have someone with Cure and All Materia to heal the party. Also have Cloud hold the Cover Materia so he can take more damage and raise his LIMIT BREAK up fast in battle.


T alk to Tifa and Aeris when you are ready and a Boss Fight will follow

Tips:


Give Cloud the Cover Materia to have him absorb some damage and raise his LIMIT BREAK faster.


Cloud's Cross-Slash LIMIT BREAK can cause the Boss to be paralyzed for s short period.


Have Aeris use Fire Magic and heal; remember to use her Healing Wind LIMIT BREAK when you can.

Boss Fight: Aps (Level: 18)

Statistics
HP MP Attack Mag
Attack
Def Mag
Def
Dex
1800 0 40 40 36 160 63
Elemental Affinity
Fire Ice Lightning
200% 100% 100%
Earth Poison Gravity
100% 100% 0%
Water Wind Holy
100% 100% 100%
Rewards
Items Gil EXP AP
Phoenix Down (Consumable Item) 253 240 22
Other Details
Morph Attacks Steal
None Lick, Sewer Tsunami, Tail Attack None

FF7 Sector 6 Sewers

After the Boss fight, head up the stairs at the bottom of the screen to get the Potion (A). Head back to your starting point and go up the ladder, run around the corner, down the ladder and up the stairs by the fence in the middle.


Head to the hole at the top-right of the screen, collect the Steal Materia (B), and enter the hole to go to the next section of the sewers.


On the next screen head right and go down the stairs. Head left and up onto the dark platform and climb the ladder.


This will take you to the train graveyard, there is a Save Point here but before you can use it a short scene will play out.

FF7 Train Graveyard Part 1

The Train Graveyard is quite easy to get through but there are a number of items that need you to backtrack. You can get through the maze by going through the trains and over them via ladders and beams.


From the save point, enter the first train (1) and exit by the barrel. Press (OK) on the barrel to get a Hi-Potion (A). Go back the way you came and climb the ladder next to the Save Point. Run along the roof, collecting the Hi-Potion (A) along the way.


When you get to the beam, take a left and press (OK) on the barrel to get an Echo Screen (C), from the barrel, head right behind the train car and down under the beam (2)


Enter the train (3) and head down, collecting a Potion (B)  along the way. Exit at the bottom and climb the ladder in front of you (4), run up and climb down the other ladder.


Head up and enter the train (5) and head up again, exit the train, collect the Potion (B)  and head up to the next part of the Train Graveyard.


Head up and lake a left, turn left again and go down to get a Potion. Head back up and turn left, head towards the barrel, press (OK) on it to receive an Ether. 


Head back to where you started, you will see a train car in the middle that is off the tracks, diagonally. Enter the train to the right of it (6) and it will move forwards, moving the train car.

FF7 Train Graveyard Part 2

Walk around the back of the train (6) and there is another train you can move (7), enter the train and it will move the train backwards. 


Climb up the ladder to the far right, collect the Hi-Potion (A) then jump across to the train (7) and walk left, along the beam onto the roof of the final train car. Climb down the ladder and head left to exit the train graveyard. You are now back at Sector 7 Station, head left again to arrive at the Pillar holding the plate above Sector 7.


FF7 Sector 7 Support Pillar

The Pillar Assault:


[Items to find: Sense Materia, Turbo Ether, Ether]

[Quest Options: Gold Saucer Date]


After a short scene, Aeris will leave your party to look for Marlene, Cloud and Tifa must fight their way up the pillar. There is a shop here, talk to the old man before doing anything else if you need anything.


Use the Save Point before heading up and make sure you are well equipped before heading up the stairs.


As you climb the stairs, you will encounter the other members of AVALANCHE, you can talk to them to get some dialogue, but your goal is at the top. Once at the top, talk to Barret, make sure to equip him with anything you have for him and when done press (OK).


A scene will play where Reno of the Turks jumps from the helicopter and presses the button to start the process of destroying the pillar.


This leads into a Boss Fight with Reno.

Item Shop Price
Potion 50 Gil
Phoenix Down 300 Gil
Antidote 80 Gil
Grenade 80 Gil
Hyper 100 Gil
Tranquilizer 100 Gil
Tent 500 Gil

Tips:


Pyramid creates a barrier around a party member, stopping them from attacking; hit the pyramid from outside to break it.


Attack with LIMIT BREAKs and keep healing. Have Cloud use the Cover Materia to get his LIMIT BREAK up.


Reno's Electro-Mag Staff attack can cause a lot of damage.

Boss Fight: Reno (Level: 17)

Statistics
HP MP Attack Mag
Attack
Def Mag
Def
Dex
1000 0 32 20 52 62 50
Elemental Affinity
Fire Ice Lightning
100% 100% 50%
Earth Poison Gravity
100% 100% 0%
Water Wind Holy
100% 100% 100%
Rewards
Items Gil EXP AP
Ether (Consumable Item) 500 290 22
Other Details
Morph Attacks Steal
None Electro-Mag Staff & Pyramid None

After the fight, talk to Tifa and another Turk will arrive in a helicopter, named Tseng, who informs you that the plate will drop soon and that he has kidnapped Aeris.

Before you can do anything, the plate support starts to blow and you must jump up on the rail after Barret and Tifa have to escape.

After the escape, a scene will play and when you are back in control you will be back in Sector 6 at the broken road from before, head up the ramp and Tifa and Barret will re-join the group. Head back to the Playground to get a
Sense Materia that is to the right of the entrance.

Head back to the broken road and head back the way you came (
See here for details ) and head back to Aeris' House.

FF7 Wall Market Batteries

After entering Aeris' house, a scene will play where we find out a bit about Aeris' past. Barret will head upstairs; you can talk to Tifa and Aeris' Mother then head upstairs and into Aeris' room where Barret is with Marlene. Walk out of the room and Barret will stop you and Marlene will ask you a question (This has an effect on the Dating mechanics). Dating Choice. You can go in the room next door to rest.


When you are ready, leave the house and head back through Sector 5 (Stop off at the house on the right, go upstairs and talk to the boy. He will give you a Turbo Ether but only if you didn't steal his 5 Gil Earlier in the game). Before leaving, make sure you have bought anything you need.


Head back to the playground and head left from the entrance to Sector 7 to go to Wall Market. Talk to the people to get some story; make sure to talk to the man in the weapon shop to get batteries (100 Gil), but the goal is to head towards Don Corneo's Mansion, when you get there, some children will run off to the right.


You can enter the mansion if you want, you can collect any of the items you may have missed (i.e. If Cloud was chosen as Don's Bride for the Night; Go up the stairs and into the door on the right. In the corner is a Phoenix Down you would not have found before). One of Don's henchmen is tied up downstairs, you can help him if you want but when you are all done in town, go right of Don't mansion (Where the children went when you arrived at Don's Mansion).

FF7 Sector 6 Wall Section 1

Talk to the child at the base of the wall and she will tell you the other children climbed up; after a short scene, you can climb the wire as well.


Continue climbing until you get to the top of the wire, head left and around towards the first socket (A) and press (OK) to insert a battery. This causes the propeller to spin and it becomes a bridge for you.


Walk up to jump onto the propeller and head up. Head left and climb up to reach another socket; insert a battery here too. The gate will raise and create another bridge, run up it and climb the wire at the top.


There is a bar swinging (C) , press (OK) when the bar is near the left side (If you miss, try again) and you will swing across.


Climb up the support to the next screen. When you reach the top, climb up the wire (1) and go left a bit and climb down the next wire (2) and the bottom, insert a battery in the socket (D) and you will receive an Ether from the box above it. Climb down the support here (3) and you will be back at the swinging bar. Do the same as before and climb up again.


This time, instead of climbing down the wire, head up and right to climb down the wire (4) and then run up the beam to get to the Shinra building.

FF7 Sector 6 Wall Section 2

FF7 Shinra HQ Entrance

Shinra HQ:


[Items to find: Elixir, Star Pendant, Four Slot, All Materia, Phoenix Down, Ether, Poison Materia, Enemy Skill Materia, Potion (4)]

[Quest Options: Gold Saucer Date, Turtle's Paradise]


When you arrive at the Shinra HQ, a short scene will play indicating 2 paths to take; the back door and the front door.


If you go by the back door, you will have to climb 9 sets of stairs (Each set of stairs is about 10 sets each) and has an Elixir in the 5th set. When you reach the top, you are on the 59th Floor.


If you go in through the front entrance, you will be attacked by the Shinra Guards at the reception. Head to the back of the room, in the top right is a bulletin board (A) with Turtle's Paradise Poster #2 on it. Go back to the front and head up the stairs (1), on the second level is an Item Shop (B) in the top right corner.


Once you have done everything you need, head to the elevator (C) to get going to the 59th Floor. Enter the elevator and press the button in the corner to start the elevator. An alarm will sound and the elevator display will go mad. Press the button again to stop at a floor and fight an enemy; you will have to do this a few times before you get to Floor 59.


On floor 59, there are some guards in front of another set of elevators, run towards them, fight them and they will drop the Keycard for Level 60.

Item Shop (B) Price
Potion 50 Gil
Phoenix Down 300 Gil
Antidote 80 Gil
Eye Drop 50 Gil
Tent 500 Gil
FF7 Shinra HQ Floor 60

Floor 60:


On floor 60, there are guards in the way, standing between the statues. 


Head into the room to the left (A) and you will need to exit via the side door and move from statue to statue when a guard is either not there or is running to a new position. When you get the the middle, you have to signal Barret and Tifa when to move with the (OK) button.


When both Barret and Tifa are in the middle, do the same again for the right side, move when no one is there or the guard is running, when you get to the end, signal Barret and Tifa as you did before.


When you have made it into the room, head up the stairs.


Floor 61:


Floor 61 is only for getting the Keycard for Floor 62. There is a guy walking around near the door. You can ask about Aeris but if you reply with "..." you get the keycard.

FF7 Shinra HQ Floor 62

62nd Floor:


On this floor, you need to get the Keycard for floor 65 from Mayor Domino (A). In order to get the Keycard, he will challenge you to guess his password. If you get it on the first try, he will also give you the Elemental Materia.


You can buy hints from Hart, who is standing outside his office (B) or you find clues on the document rooms (C).


To guess the answer, check each room of documents like this:


  1. Check the room name plate (Yellow panel next to door)
  2. Check each book case for a document that does not belong there. (A weapons document in Space Research for example) there are 2 documents per book case.
  3. There will be a number on the document, the letter you need is that many letters from the start of the name. (16  Modern history of Midgar space program vol. 1 = M)
  4. The 4 letters you find will spell one word on his list.

| BEST | KING | ORBS | BOMB | MAKO | HOJO |


Give answer to Domino and get your prize(s).


You can now head up to the next floor.

FF7 Shinra HQ Floor 63

Floor 63:


This floor is optional but has some items you can collect.


There are 3 Item Coupons to collect that you can trade for a Star Pendant, a Four Slot & an All Materia.


First, go into the room with the computer (A) and press (OK) on the computer. It will tell you that you are permitted to open 3 doors and to not climb in the air ducts.


Head out of the computer room and head up to the door (1) and press (OK) to open it. Head left to the far left door (2) and press (OK) to open it.


Enter the room to get Item Coupon 1 (B) and enter the air vent in the corner of the room.


Climb through the air duct and at the junction, head up to get Item Coupon 2 (C). Exit through the door of this room and open door (3) and enter the next room to get Item Coupon 3.


Head back the way you came and into the air duct, head down and then right to the computer room.


Use the computer again to get the items mentioned above.


Floor 64:


This floor is a great place to rest and save, there is a rest room to the left with a save point and you can also rest here to get HP/MP back.


Head to the back of this floor, into the locker room. Check the lockers to find a Phoenix Down and an Ether. There is also a Megaphone here but you can't take it... yet.


Now, head up to the next floor.

FF7 Shinra HQ Floor 65

Floor 65:


This floor has a large scale model of Midgar in the middle, but there are pieces missing. You can only get one set of parts at a time and each piece that gets added opens another chest. One Sector has no parts.


Head to the top room on the left and open the chest (A) to get "Midgar Parts", go to the model in the middle and place them on the model at one of the open spaces.


Head to the bottom left room and open the box (B) to get more parts, add them to the model.


Back to the first room and open the chest (C) for more parts, add them to the model.


Back to the second room and open chest (D) for more parts, add them to the model.


The final parts are in the top left room, open chest (E), add them to the model.


Go to the stairs and open the last chest (F) to get Keycard 66.


Go to the next floor.

FF7 Shinra HQ Floor 66

Floor 66:


This floor has a large room in the middle where Shinra Executives will be holding a meeting.


Head to the top left corner of the floor, enter the bathroom and enter the stall. Walk up to the toilet and climb up and head down the duct to the vent in the foreground.


After a scene where Shinra Execs talk about their plans, exit the duct the way you came in and exit the bathroom. Go around to the stairs on the right and follow Hojo upstairs to Floor 67.

FF7 Shinra HQ Floor 67

Floor 67:


Follow Hojo around to the storage room where a scene will play, Cloud will have a bit of a breakdown after seeing "Jenova". Once done, head up and there is a Save Point and a Poison Materia.


Tip: Equip the Poison Materia to a slot in a character's armour (As long as it is a linked slot) and, in the other slot, put the Elemental Materia. This will make that character immune to Poison status. Barret or Tifa will leave your party for the next Boss fight, so plan ahead.


Floor 68:


Head down the ramp and a scene will play where the creature in the tank downstairs will be raised into the tank holding Aeris. After a bit of dialogue, the door will be opened and the creature will jump out to attack Hojo. This is a new party member called [Red XIII].


After a bit more dialogue, you have to choose your party for the Boss Fight by either having Tifa or Barret accompany her, this has an effect on the Dating mechanics. Dating Choice.

Tips:


You can protect a party member who has a linked Materia slot on armour by attaching Poison Materia and Elemental Materia in the linked slot.


Short-range weapons won't work against the Boss; use magic and Long-range weapons.


Only fight the Boss on the back row, the other enemies will just keep respawning when defeated and are a waste of time.

Boss Fight: Sample H0512 (Level: 19)

Statistics
HP MP Attack Mag
Attack
Def Mag
Def
Dex
1000 120 40 35 60 64 65
Elemental Affinity
Fire Ice Lightning
100% 100% 50%
Earth Poison Gravity
100% -100% 0%
Water Wind Holy
100% 100% 100%
Rewards
Items Gil EXP AP
Talisman (Accessory) 250 300 30
Other Details
Morph Attacks Steal
None Keyclaw, Reanimagic & Shady Breath None

FF7 Shinra HQ Floor 68

After the battle, Aeris and Tifa/Barret will come back and you have to choose a party going forward (This also has an effect on the Dating Mechanics. Dating Choice.); Press (Menu) for the Menu, (Cancel) to select Party and (OK) to confirm changes and move on.


Inside the container where Red XIII and Aeris were will be an Enemy Skill Materia (B). From this screen, run left and down and head up the ramp, Hojo's assistant (D) will still be here, talk to him and you will get the Keycard 68. At the top of the ramp will be 2x Potion (C), head down the ramp and follow Hojo's assistant out of the room to find 2x Potion (C). Head down the stairs to Floor 66 and enter the elevator.


Before you can do anything, you will be apprehended by the Turks. After meeting with President Shinra, you will be in a holding cell on Floor 67.


Talk to Tifa (This affects the Dating Mechanics. Dating Choice.) and then move towards the door; you will be given three choices, each of these has an effect on the Dating mechanics. When you are done, choose to get some sleep to continue.

FF7 Shinra HQ Floor 70 - President's Office

Jailbreak!:


When you wake up, the door to your cell will be open, go outside and check the guard. Go back into your cell and talk to Tifa, follow her outside and talk to her again.


Go to Barret and Red XIII's cell and talk to Barret, follow them back to the guard and then talk to Tifa.


Head back into the storage room where you found Jenova and talk to Red XIII. Follow him to the elevator in the back and go up to Floor 68. There is now blood on the floor, follow it up to President Shinra's office. On Floor 69 is a Save Point if you need it.


Head up to Floor 70 and approach President Shinra's desk. After a scene Rufus Shinra, President Shinra's son, will arrive. Head outside (1) and after a scene, Cloud will tell everyone to leave so he can face Rufus.


Everyone will run down the stairs, Tifa will stay behind and you are given the option to remove Cloud and Tifa's Materia if you wish.


Tip: Prepare for battle! Boss fight coming up.


Head towards the elevator at the bottom of the screen, enter the elevator and use the control panel. Two Boss Fights happen here.

Tips:


Boss is weak to Lighning; cast Bolt with Aeris and Red XIII.


Barret is the only one who can hit the Boss with normal attacks.


LIMIT BREAKs are useful here.


You do not receive rewards for this battle.

Boss Fight: Hundred Gunner (Level: 18)

Statistics
HP MP Attack Mag
Attack
Def Mag
Def
Dex
1600 0 52 0 46 240 63
Elemental Affinity
Fire Ice Lightning
100% 100% 200%
Earth Poison Gravity
100% 100% 50%
Water Wind Holy
100% 100% 100%
Rewards
Items Gil EXP AP
None 0 0 0
Other Details
Morph Attacks Steal
None Keyclaw, Reanimagic & Shady Breath None

Tips:


Boss is weak to Lighning; cast Bolt with Aeris and Red XIII.


Barret is the only one who can hit the Boss with normal attacks.


LIMIT BREAKs are useful here.

Boss Fight: Heli Gunner (Level: 19)

Statistics
HP MP Attack Mag
Attack
Def Mag
Def
Dex
1000 0 55 0 40 / 90 220 / 270 66
Elemental Affinity
Fire Ice Lightning
100% 100% 200%
Earth Poison Gravity
0% 100% 100%
Water Wind Holy
100% 200% 100%
Rewards
Items Gil EXP AP
Mythril Armlet (Armour) 200 250 25
Other Details
Morph Attacks Steal
None AB Canon, C Canon, Firing Line, Flying Drill & Spinning Bodyblow None

After the Boss fights with Barret, Tifa and Red XIII, we come back to Cloud. You are given the chance to update Cloud's equipment, Materia etc. before the Boss Fight with Rufus.

Tips:


Take out Dark Nation first as it can cast Barrier and M Barrier on Rufus; if you do not defeat Dark Nation before defeating Rufus, you will lose the EXP, AP, Gil and Reward.


Make sure to heal after Shotgun as it can cause decent damage.


Rufus has a high magic defence, so physical attacks work well.

Boss Fight: Rufus Shinra (Level: 21) / Dark Nation (Level: 18)

Statistics
HP MP Attack Mag
Attack
Def Mag
Def
Dex
500 / 140 0 / 80 35 / 43 0 / 15 32 / 38 160 / 94 66 / 74
Elemental Affinity
Fire Ice Lightning
100% 100% 100%
Earth Poison Gravity
100% 100% 100%
Water Wind Holy
100% 100% 100%
Rewards
Items Gil EXP AP
Protect Vest (Accessory)
Guard Source (Consumable Item)
400 / 250 240 / 70 35 / 7
Other Details
Morph Attacks Steal
None Rufus: Shotgun
Dark Nation: Barrier, Bite, Bolt & MBarrier
None

FF7 Midgar Highway

Escaping Midgar:


After defeating Rufus, head back into the President's office and head down the stairs. Meet up with Tifa by the door.


Back with Aeris' team, head towards the front door for a scene where Cloud will arrive on a motorbike and you escape through a window.


You will now get a quick tutorial for the arcade sequence that follows, press (OK) to attack right and (Switch) to attack left. You can open the menu and also form a party from here (Your party choice will affect the Dating mechanics. Dating Choice.)


Tip: There is a Boss fight coming up, so prepare for it.  It is weak to lightning, so equip Cloud with Lightning and Elemental on his weapon to deal Lightning damage to physical attacks.


Once done, press (START) to begin. Use the directions to move and attack the enemies that come to take out the car with your party in it.


Once you have finished this sequence, there is a Boss fight.

Tips:


Attach Fire and Elemental Materia to a linked armour slot to reduce Fire damage from attacks.


Boss is weak to Lighning; cast Bolt as often as you can.


Boss will back attack you dealing damage at the very start; have Restore and All Materia in linked slot to heal the party.


Boss has 2 forms; in the normal form it takes 50% damage from Fire, but in Flamethrower form is takes no damage.

Boss Fight: Motorball (Level: 19)

Statistics
HP MP Attack Mag
Attack
Def Mag
Def
Dex
2600 120 44 17 32 34 67
Elemental Affinity
Fire Ice Lightning
50% * 100% 200%
Earth Poison Gravity
100% 100% 0%
Water Wind Holy
100% 100% 100%
Rewards
Items Gil EXP AP
Star Pendant (Accessory) 350 440 45
Other Details
Morph Attacks Steal
None Upright: Arm Attack, Deadly Wheel & Rolling Fire
Flamethrower Form: Twin Burner
None

After the fight, you will escape Midgar via a cable and be outside the walls of the city. You can talk to your party but when you are ready, head to the bottom of the screen to initiate a final scene where you can choose your party and finally, head down to leave the city.

Kalm

FF7 Kalm Inn

Kalm (Flashback):


Head north east to Kalm, the nearest town to Midgar. As an additional show of how polluted Midgar is, the map is very dark around Midgar, but as you move away it gets lighter.


Enter the town and head to the Inn where your party are waiting. Head upstairs for a scene where Cloud remembers a mission with Sephiroth in his hometown of Nibelheim.

FF7 Nibelheim Flashback Part 1

During the journey, you will encounter a monster. Sephiroth and Cloud will fight it and you can see the difference in strength as Cloud will not get much offense in.


After arriving at Nibelheim, you can talk to the soldiers and Sephiroth and enter the town. After a brief talk with Sephiroth, you can explore the town. If you go somewhere that is not part of the story, you will leave immediately but you can go into Cloud's home (2) and have the choice of not talking about it or talking about home.


Next door to Cloud's house is Tifa's house (3), go in and head upstairs. In Tifa's room (The one with the piano) you can go to the dresser and get a pair of Orthopaedic Underwear. When you are done, head to the inn (1) by the entrance to the town, you can talk to the receptionist and the man next to him (Who is Tifa's martial arts teacher), then head upstairs and talk to Sephiroth a couple of times, if you are done in town you can go to sleep.

FF7 Nibelheim Flashback Mt. Ni

When morning comes, talk to Sephiroth and Tifa will arrive to be the guide. On the bridge, talk to Tifa and follow her. The bridge will break and you will all fall.


When you recover, you will travel as a party, follow the path and enter the cave. Take the right path and follow it up. You will arrive at a Mako fountain, after a short scene where we are told that Materia is formed like this, you will see a scene of the party walking up the mountain.


When you arrive at the Mako reactor, walk up the stairs for another scene. When inside, walk along the beam to the wooden platform, jump off the beam to the platform and jump onto the chain to climb down.


Follow Sephiroth into the heart of the reactor. Walk up the stairs and talk to Sephiroth. Walk up to the pod Sephiroth looks at and press (OK) to close the valve. Talk to Sephiroth again and he will tell you to look into the pod.


After another scene you will be given the opportunity to save and rest before continuing the story.

FF7 Nibelheim Shinra Mansion Flashback

After waking up the next morning, Cloud will head to the Shinra Mansion. When you go in head up the stairs and go right, you will see a room with a soldier in it, talk to him and he will say he saw Sephiroth go in here but he's nowhere to be found.


In the corner of the room is a hidden entrance, go inside and head down the spiral staircase.


Follow the path (towards the screen, then right) and there is a door at the end where you will find Sephiroth. After a scene you can talk to Sephiroth, but he tells you to let him be alone. Leave the room and a scene will play.

FF7 Nibelheim Flashback Fire

When you wake up, head back to the basement library and head to the back room where another scene will play. Follow Sephiroth and leave the Mansion where you will see that the town is now ablaze, head towards the town and a scene will play. Talk to the downed soldier who will say "Seph..itoh" and then enter Cloud's house.


A scene will play and you will arrive back at the Mako Reactor. Head towards the reactor the same way as before and another scene will play.


Follow Tifa into the reactor and another scene will play. After Tifa gets cut, talk to her then follow Sephiroth into the Jenova Room for another scene.


After the scene, Barret will go to leave, the dialogue choices here has an effect on the Dating mechanics.

FF7 Kalm Town

Kalm Town:


[Items to find: Megalixir, Ether (3), Peacemaker, Guard Source]

[Quest Options: Gold Saucer Date]


After the story is finished, walk up the dresser in the corner, to the left of the stairs, press (OK) on it and you will see an item but it says "Can't reach it...), to get the item, you have to press (OK) several times until Cloud gets annoyed and kicks the dresser, the item will fall and you will get a Megalixir.


As you go to leave the Inn, Barret will give you the [PHS], this item is used to swap party members at Save Points or on the World Map and is accessed from the menu.


Talking to Barret before leaving the Inn has an efect on the Dating section. Dating Choice.


Now you can explore the town and stock up. There are free items to be had as well. Go inside the first house (A) and there is a door under the stairs, open it to receive an Ether. Head next door (B) and go upstairs, there is a cupboard you can open with another Ether in it.


Next door to that (C) there is a spiral staircase in the back, head up and there is a chest with a Peacemaker, head back down and you will see a normal staircase, head up and there is a cabinet next to the girl with a Guard Source.


Tip: Do not buy the Cannon Ball for Barret, run around outside Midgar and wait for a Custom Sweeper enemy; you can steal an Atomic Scissors from them which is more powerful.


At the back of town, is a staircase, head up for the shops; Item shop (D), Materia Shop (E) and Weapon Shop (F). You can also rest at the inn for 20 Gil. There is a house in the east of the town (G), go in and there is a door under the stairs, open it to get an Ether.


There are people to talk to, one is a woman who will talk about the "old ways" and another will mention how Mako is "convenient"; your answers will affect the Dating mechanics. Dating Choice. When you are ready, leave town.

Item Shop (D) Price
Potion 50 Gil
Phoenix Down 300 Gil
Antidote 80 Gil
Eye Drop 50 Gil
Hyper 100 Gil
Tranquilizer 100 Gil
Tent 500 Gil
Materia Shop (E) Price
Earth 1500 Gil
Poison 1500 Gil
Steal 1200 Gil
Sense 1000 Gil
Heal 1500 Gil
Weapon Shop Price
Mythril Sword 1000 Gil
Cannon Ball 950 Gil
Mythril Claw 750 Gil
Full Metal Staff 800 Gil
Mythril Armlet 350 Gil

FF7 Chocobo Ranch - Summon Materia

Chocobo Farm:


[Items to find: Choco/Mog Materia]


Head south-east towards the Chocobo Ranch; upon entering the ranch, talk to the first Chocobo, nearest to you. The Chocobo's will dance for a minute then give you your first Summon Materia, Choco/Mog.


Enter the house to the left of the pen for an explanation of the journey ahead. Afterwards, head to the barn, talk to Choco Billy and ask for a Chocobo. You can get a tutorial on how to catch Chocobo's from him and for 2000 Gil he will sell you the Chocobo Lure Materia, which you need to get a Chocobo, and the greens to feed them.


Leave the farm and head either south or north and find a patch of ground with Chocobo tracks, while having the Chocobo Lure Materia equipped the random encounters have a chance of having a Chocobo in the mix.


Use the greens to keep the Chocobo from running away while you deal with the enemies that accompany it and if the Chocobo is still there when the enemies are defeated, you get to ride it.


Head west to the Mythril Mines, avoiding the Midgar Zolom (Unless you want to fight it, see below). Dismount the Chocobo and walk up to the entrance to the mines.

Vegetable Store Price
Chocobo Lure (Materia) 2000 Gil
Mimett Greens 1500 Gil
Curiel Greens 1000 Gil
Pahsana Greens 800 Gil
Tantal Greens 400 Gil
Krakka Greens 250 Gil
Gysahl Greens 100 Gil

Tips:


The main reason to battle this Boss is to get the Enemy Skill Beta.


Equip Fire Materia with Elemental Materia on a linked slot on armour to help with damage from Beta.


Boss will cast Beta when HP is under 50%; it hits entire party.


Casting Beta back at the Zolom can finish it off, but it can use Bite after Beta so you may need to try this a few times if you are a low level.

[Optional] Boss Fight: Midgar Zolom (Level: 26)

Statistics
HP MP Attack Mag
Attack
Def Mag
Def
Dex
4000 348 120 40 90 70 54
Elemental Affinity
Fire Ice Lightning
100% 100% 100%
Earth Poison Gravity
100% 100% 100%
Water Wind Holy
100% 100% 100%
Rewards
Items Gil EXP AP
None 400 250 25
Other Details
Morph Attacks Steal
X-Potion Normal: Bite
Standing: Beta, Bite & Blown Away
None

FF7 Mythril Mines Full Map

Mythril Mines:


[Items to find: Mind Source, Ether, Tent, Long Range Materia, Elixir, Hi-Potion]


When you approach the mine entrance, there is a scene with a dead Midgar Zolom impaled on a spike. Sephiroth has been this way; enter the mines and head down to collect a Mind Source (A), there are 2 exits, head to exit (1)


There are a few items here, there are some stairs leading to a Ether (B) and a Tent (C). At the bottom of the stairs is a vine you can climb (3) and at the top is a Long Range Materia (D)


Head back to the first screen then head to the other exit (2). The Turks will be here, Rude and Elena, who will start to explain their mission and Tsung will interrupt. After they have left, head up to (4) where there are a couple more items; Elixir (E) and Hi-Potion (F)


Head back to the room where the Turks were and climb the vine Rude did and exit the mines (5).


FF7 Fort Condor 1st Visit

Fort Condor:


[Quest Options: Gold Saucer Date, Fort Condor Battle, Finding Yuffie]


From the Mythril Mines, head south west to Fort Condor. 


Here you can participate in battles against Shinra in a strategy-style mini-game. You can return here multiple times during the game to participate.


There is a man near the entrance you can talk to who will give directions to Junon, head past him and up the rope to enter the fort.


Before you can use the facilities, you have to agree to join the cause. Head up the ladder and talk to the man at the table, he will tell you why they are fighting Shinra and agree to help. The dating mechanics are affected by this conversation. Dating Choice.


You can now use the shops and rest for free.


Once done, leave Fort Condor and head North-West towards Junon, which is located at the edge of the sea.


On the way, there are some forests where you can try and encounter a new party member named [Yuffie], for details on how to get her to join, check the guide.

Item Shop (A) Price
Potion 50 Gil
Phoenix Down 300 Gil
Hyper 100 Gil
Tranquilizer 100 Gil
Tent 500 Gil
Materia Shop (B) Price
Fire 600 Gil
Lightning 600 Gil
Ice 600 Gil
Restore 750 Gil

FF7 Junon Harbour Village

Junon Harbour:


[Items to find: Shiva Materia]

[Quest Options: Fort Condor Battles]


Upon entering the town of Junon, you will find there is not much to do. There is a Weapon Shop (A) and a place to rest (After the Boss fight) (B). There are also some stairs that lead to a beach.


Make sure to get anything you need and heal as a Boss Fight will happen when you go to the beach.


Tip: The boss is a Long-Range enemy, equip Cloud with the Long Range Materia and have Barret in your party (With a long range weapon)

Weapon Shop (A) Price
Mythril Armlet 350 Gil
Potion 50 Gil
Phoenix Down 300 Gil
Grenade 80 Gil
Tent 500 Gil

Tips:


Boss requires Long Range to attack; Barret and Yuffie can attack without Long Range Materia but anyone else will need this Materia.


Waterball traps a party member and drains HP from them. Use magic that can attack multiple enemies to break the waterball and damage the Boss.


Keep an eye on HP; when Boss is defeated it will use Big Wave before it disappears.

Boss Fight: Bottomswell (Level: 23)

Statistics
HP MP Attack Mag
Attack
Def Mag
Def
Dex
2500 100 42 30 36 96 69
Elemental Affinity
Fire Ice Lightning
100% 100% 100%
Earth Poison Gravity
0% 100% 50%
Water Wind Holy
100% 200% 100%
Rewards
Items Gil EXP AP
Power Wrist (Accessory) 1000 550 52
Other Details
Morph Attacks Steal
None First Form: Tail Attack & Waterball
Second Form: Bobyblow, Moonstrike & Waterball
Third Form: Big Wave & Waterball
None

FF7 Junon CPR

Once the boss is defeated, Pricilla is unconscious and must be revived with CPR. Press the (Switch) button to start inhaling and press it again when your lungs are as full as possible to try and revive Pricilla. After a few times, she will awaken and be taken back to the village.


Head back to the village and head to the old woman's house (B) and she will let you stay there for free. Sleep and when you wake up, head outside to the centre of the village. [Fort Condor Battle]


Talk to your party, start to go up the stairs they are standing in front of and Pricilla will come out. She will apologise for believing you were from Shinra and gives you Shiva Summon Materia.

FF7 Junon Beach Dolphin Jump

Follow Pricilla to the beach and talk to her. [Fort Condor Battle]


Mr Dolphin will help you reach Upper Junon; Pricilla will give you a whistle, press (Switch) to blow the whistle and Mr. Dolphin will swim under you and jump with you on it.


Your goal is to get to the beam, check the adjacent picture for a rough idea of where you need to be to jump up successfully (1). It can take a few tries to get the exact place.


When you are on the beam, head to the left and climb up the tower.


Junon

FF7 Junon Parade

Junon Parade:


When you reach the top, head towards the screen and on the next screen you will see a yellow switch, run up to it and use the switch (1) to operate the lift. Head towards the entrance (2) and enter the building. Inside, a Shinra soldier will mistake you for an actual soldier, he tells you to enter the room behind him. Open the locker that is slightly ajar and put on the uniform.


After a brief tutorial, you will have to march in the parade. Depending on how well you do, you will get an item (See the table to the right). You have to march in step with the other soldiers and use (OK) to shoulder your gun in time with the others.


Follow the other soldiers and you will be in an alleyway, you have to join the parade. This can be a pain and is hard to get a good score.


Tip: When the commander shouts "Charge!", run straight forward until you are in the gap at the back, then press (OK) for a second, let go and keep doing it; the ratings should shoot up.

Percent Item
29% or Lower Grenade
30% - 39% Potion (x6)
40% - 49% Ether (x6)
50% or higher 5000 Gil
FF7 Upper Junon Shops

Upper Junon:


[Items to find: Luck Source, 1/35 Soldier, Mind Source, Power Source, Guard Source, Enemy Skill Materia]


After the scene with Rufus and Heidegger, you will go back to the locker room to practice the send-off. 


You must press (OK), (Menu), (Switch), (Cancel), (Left) then (Right) in a random order with good timing, you can practice this with the commander.


You can freely look around the town; there are some shops and free items to be had.


  • Talk to the man outside the Materia shop (A) and you can go in and buy Materia. 
  • In the alleyway next door is a weapon shop (B) there is also a bar under the weapon shop (down the stairs) where you will find Rude of the Turks.
  • The item shop is the door to the left of the alleyway (C).

Finally, there is a door to the left of the Item shop with many interesting things:

  • Immediately to the right as you walk in are some stairs, head up. On the first floor are a few items: Luck Source, 1/35 Soldier & Mind Source
  • Head upstairs again; there is a PowerSource next to the soldier at the desk and there is a Guard Source in front of the door to the right of the soldier's room.
  • Go back downstairs to the ground floor and enter the main room, there is a man running around (It's his uniform that you are wearing). You can talk to him, but in the bottom-right corner is a hidden area, talk to the soldier and you can enter the "Respectable Inn". This is another Beginners' Hall but there is an Enemy Skill Materia in the corner. Once done, leave the building.

Materia Shop (A) Price
Sense 1000 Gil
Seal 3000 Gil
Restore 750 Gil
Heal 1500 Gil
Revive 3000 Gil
Weapon Shop (B) Price
Hardedge 1500 Gil
Grand Glove 1200 Gil
Atomic Scissors 1400 Gil
Striking Staff 1300 Gil
Diamond Pin 1300 Gil
Boomerang 1400 Gil
Item Shop (C) Price
Potion 50 Gil
Hi-Potion 300 Gil
Phoenix Down 300 Gil
Antidote 80 Gil
Eye Drop 50 Gil
Echo Screen 100 Gil
Hyper 100 Gil
Tranquilizer 100 Gil
Tent 500 Gil
FF7 Lower Junon

Lower Junon:


[Items to find: Speed SOurce, 1/35 Soldier]


Exit the shops via the exit (1), follow the path shown here through a few screens and you will reach another street with some areas to see.


There is another street with doors you can go in, There is a bar (A) where the other members of the Turks can be found (Rude, Tseng & Elena).


Next door (B) is a place you can rest at for 30 Gil and a Save Point. There are also stairs leading up; on the first floor is a woman, talk to her to access another Materia Shop, further upstairs is an Accessory shop.


Next door (C) is a soldier resting in the main room, in the room next to it is a Speed Source. Head upstairs and into the room, there is another 1/35 Soldier here and a man lying down.


Finally, there is a Weapon shop (D) next door. Once done, head towards the exit to the Docks (5).

Materia Shop (B) Price
Fire 600 Gil
Ice 600 Gil
Lightning 600 Gil
Earth 1500 Gil
Poison 1500 Gil
Accessory Shop (B) Price
Silver Glasses 3000 Gil
Headband 3000 Gil
Weapon Shop (D) Price
Mythril Saber 1000 Gil
Cannon Ball 950 Gil
Mythril Claw 750 Gil
Full Metal Staff 800 Gil
Mythril Clip 800 Gil
FF7 Junon Send Off Parade

Send off at the Docks:


You now have to put what you learned earlier to use, the commander will call a command and you must press that command immediately to perform the pose.


The commands are random and are called without pause, after performing an action, another will follow quickly.


Your goal is to increase Rufus' mood which is indicated by the score at the bottom.


You will receive a "Bonus" from Heidegger based on the score, see the table to the right for details.


When you are done, board the boat.

Mood Item
0 - 50 Silver Glasses (Accessory)
60 - 90 HP Plus (Materia)
100 + Force Stealer (Weapon)

FF7 Cargo Ship

Cargo Ship:


[Items to find: Ether, All Materia, Wind Slash, Ifrit Materia]

[Quest Options: Gold Saucer Date]


You are now aboard the Cargo Ship with Rufus and the rest of your party. Immediately on your left is a box (A) with an Ether in it.


Talk to the people here, two of them are Yuffie and Aeris, your conversations here have a bearing on the Dating mechanics. Dating Choice.


Yuffie is in the way of an All Materia (B) but you can get it later. Head up the stairs (1) and talk to the sailor by the side of the boat (C) he is an item shop and offers a "remedy" that will restore HP and MP for 250 Gil depending on your reply to him.


Talk to the guys on deck as there are more party members here; Red XIII and Tifa. Dating Choice


Head to the front of the ship (3) to find Barret who is spying on Rufus. Talk to him a couple of times and an alarm will sound. Head back to the deck for a scene and choose your party. Make sure to equip them with any weapons, armour and Materia you got from Junon. There is a Boss Fight coming up, so prepare.


Head back down to the cargo hold where you started, grab the All Materia (B) if you were not able to get it earlier, then head into the engine room (2) that was being guarded earlier.


Inside the boiler room, go up the ladder (4) to the left and head around to the other side where you will find a box (D) with Wind Slash.


When you are ready, talk to the man standing at the back of the room (E).

Item Shop (C) Price
Potion 50 Gil
Phoenix Down 300 Gil

Tips:


If you have the Enemy Skill "Beta" from the Midgar Zolom, it can be very handy here for heavy Fire damage.


Jenova-BIRTH uses Stop which can prevent a party member from attacking for a while.


Keep an eye on HP; Laser may be quite weak but it can do this up to 3 times in a single turn and, if it hits the same party member each time, it can do major damage.


Boss uses attacks in a specific order: Stop > Laser > Tail Laser > W-Laser > Gas.

Boss Fight: Jenova-BIRTH (Level: 25)

Statistics
HP MP Attack Mag
Attack
Def Mag
Def
Dex
4000 110 38 30 56 180 60
Elemental Affinity
Fire Ice Lightning
100% 100% 100%
Earth Poison Gravity
100% 100% 0%
Water Wind Holy
100% 100% 100%
Rewards
Items Gil EXP AP
White Cape (Accessory)
Ifrit (Materia) *
800 680 64
Other Details
Morph Attacks Steal
None Gas, Laser, Stop, Tail Laser * W-Laser None

(*) Ifrit Materia is on the floor where the Boss was.


FF7 Cargo Ship - Ifrit Materia

After the battle, your party will talk for a bit then an announcement that you will be docking soon cuts you off.


Your party leave, before you follow, remember to collect the Ifrit Materia behind you.


Exit the engine room and after a short scene of the ship entering the dock, you will have arrived at Costa del Sol.


FF7 Costa Del Sol Town & Beach

Costa del Sol:


[Items to find: Fire Ring, Motor Drive, Power Source]


After a short scene, follow your party into Costa del Sol. Walk across the bridge and into the door at the top, this is Shinra Villa, you can buy this place for 300,000 Gil but for now, head into the basement via the stairs in the lower-right corner where you will find a chest with a Fire Ring and 2 items; Motor Drive and Power Source.


Exit the building and head down the stairs; there are a few shops here; A Weapon Shop (A) (This is a man inside the bar), Materia Shop (B), an Item Shop (C) and an Inn (D).


Once you have shopped and talked to everyone you want to, go down to the beach. On the beach, you will see Hojo (E), go over and talk to him. He will ask you some questions and then tell you to head west.


Before leaving, make sure you have stocked up and consider buying some Soft, the enemies ahead use petrification so Soft will come in handy.

Weapon Shop (A) Price
Platinum Bangle 1800 Gil
Carbon Bangle 800 Gil
Four Slots 1300 Gil
Molotov 400 Gil
Materia Shop (B) Price
Heal 1500 Gil
Revive 3000 Gil
Restore 750 Gil
Seal 3000 Gil
Fire 600 Gil
Ice 600 Gil
Lightning 600 Gil
Item Shop (C) Price
Potion 50 Gil
Hi-Potion 300 Gil
Phoenix Down 300 Gil
Soft 150 Gil
Antidote 80 Gil
Eye Drop 50 Gil
Hyper 100 Gil
Tranquilizer 100 Gil
Tent 500 Gil

FF7 Corel Tracks

Mt. Corel:


[Items to find: Wizard Staff, Star Pendant, W Machine Gun, Turbo Ether, Transform Materia, Phoenix Down (10), Power Source, Mind Source, Tent]


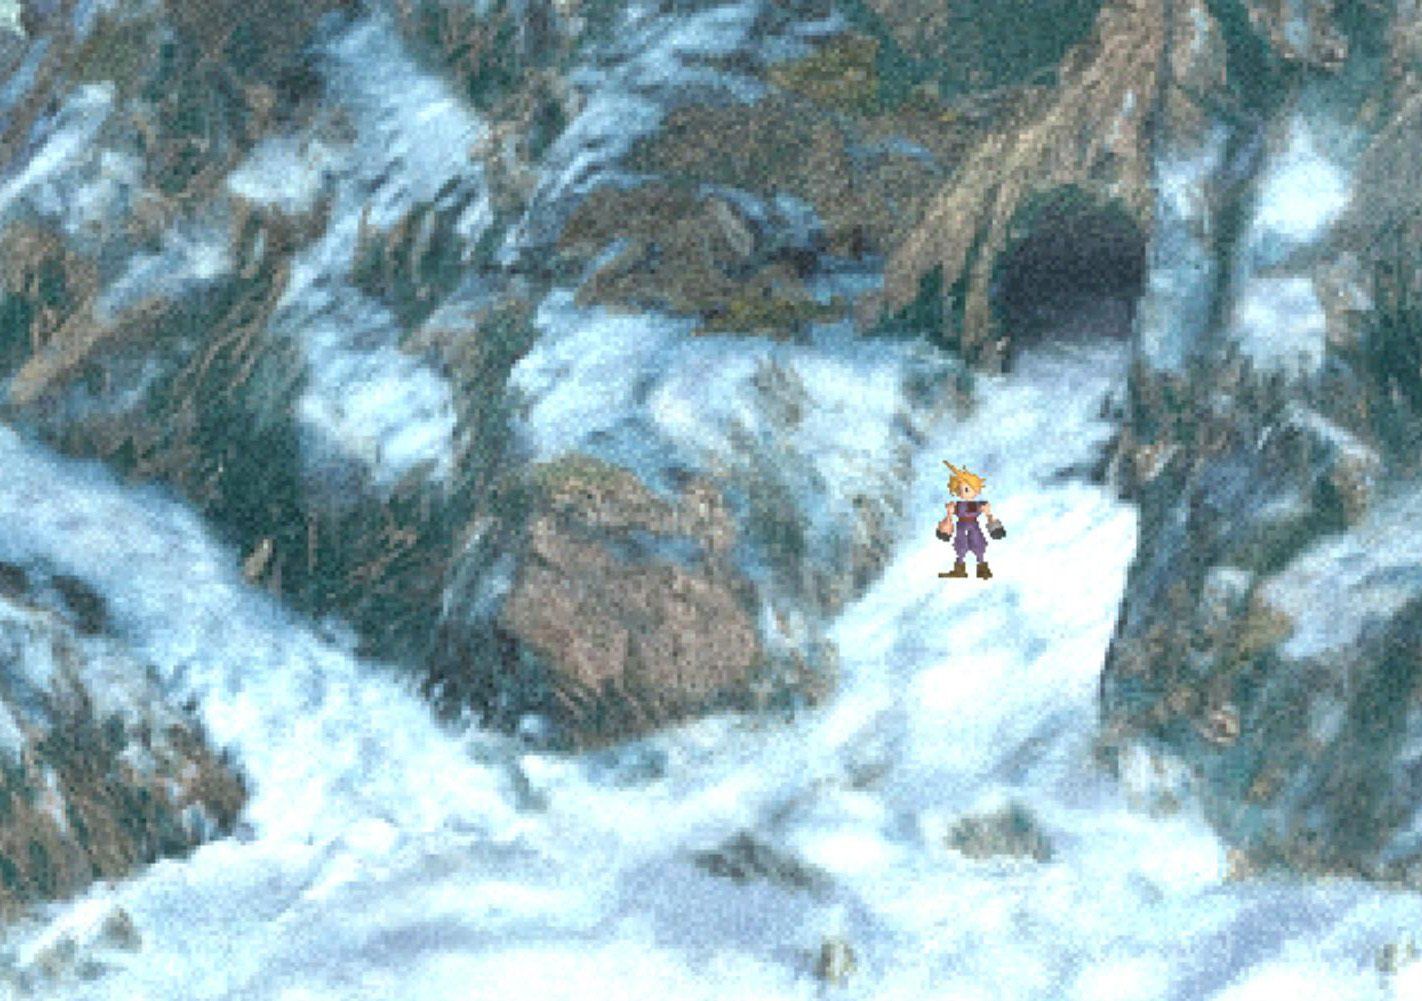
Leaving Costa del Sol, head west to Mt. Corel, to get there, follow the mountain road and you will arrive at a river. The entrance is in the mountains to the left of the river.


Head up the hill and talk to the man sat down, he will tell you that a "Black Caped man" came by here. Continue up the hill, on the next screen, continue up the hill.


You will now arrive at the Corel Mako Reactor, there is nothing to do here now but remember where it is for later. For now, head down the stairs and past the Reactor, along the bridge to the bottom of the screen. There are a few paths on this next screen, for now, just run along the tracks in front of you.


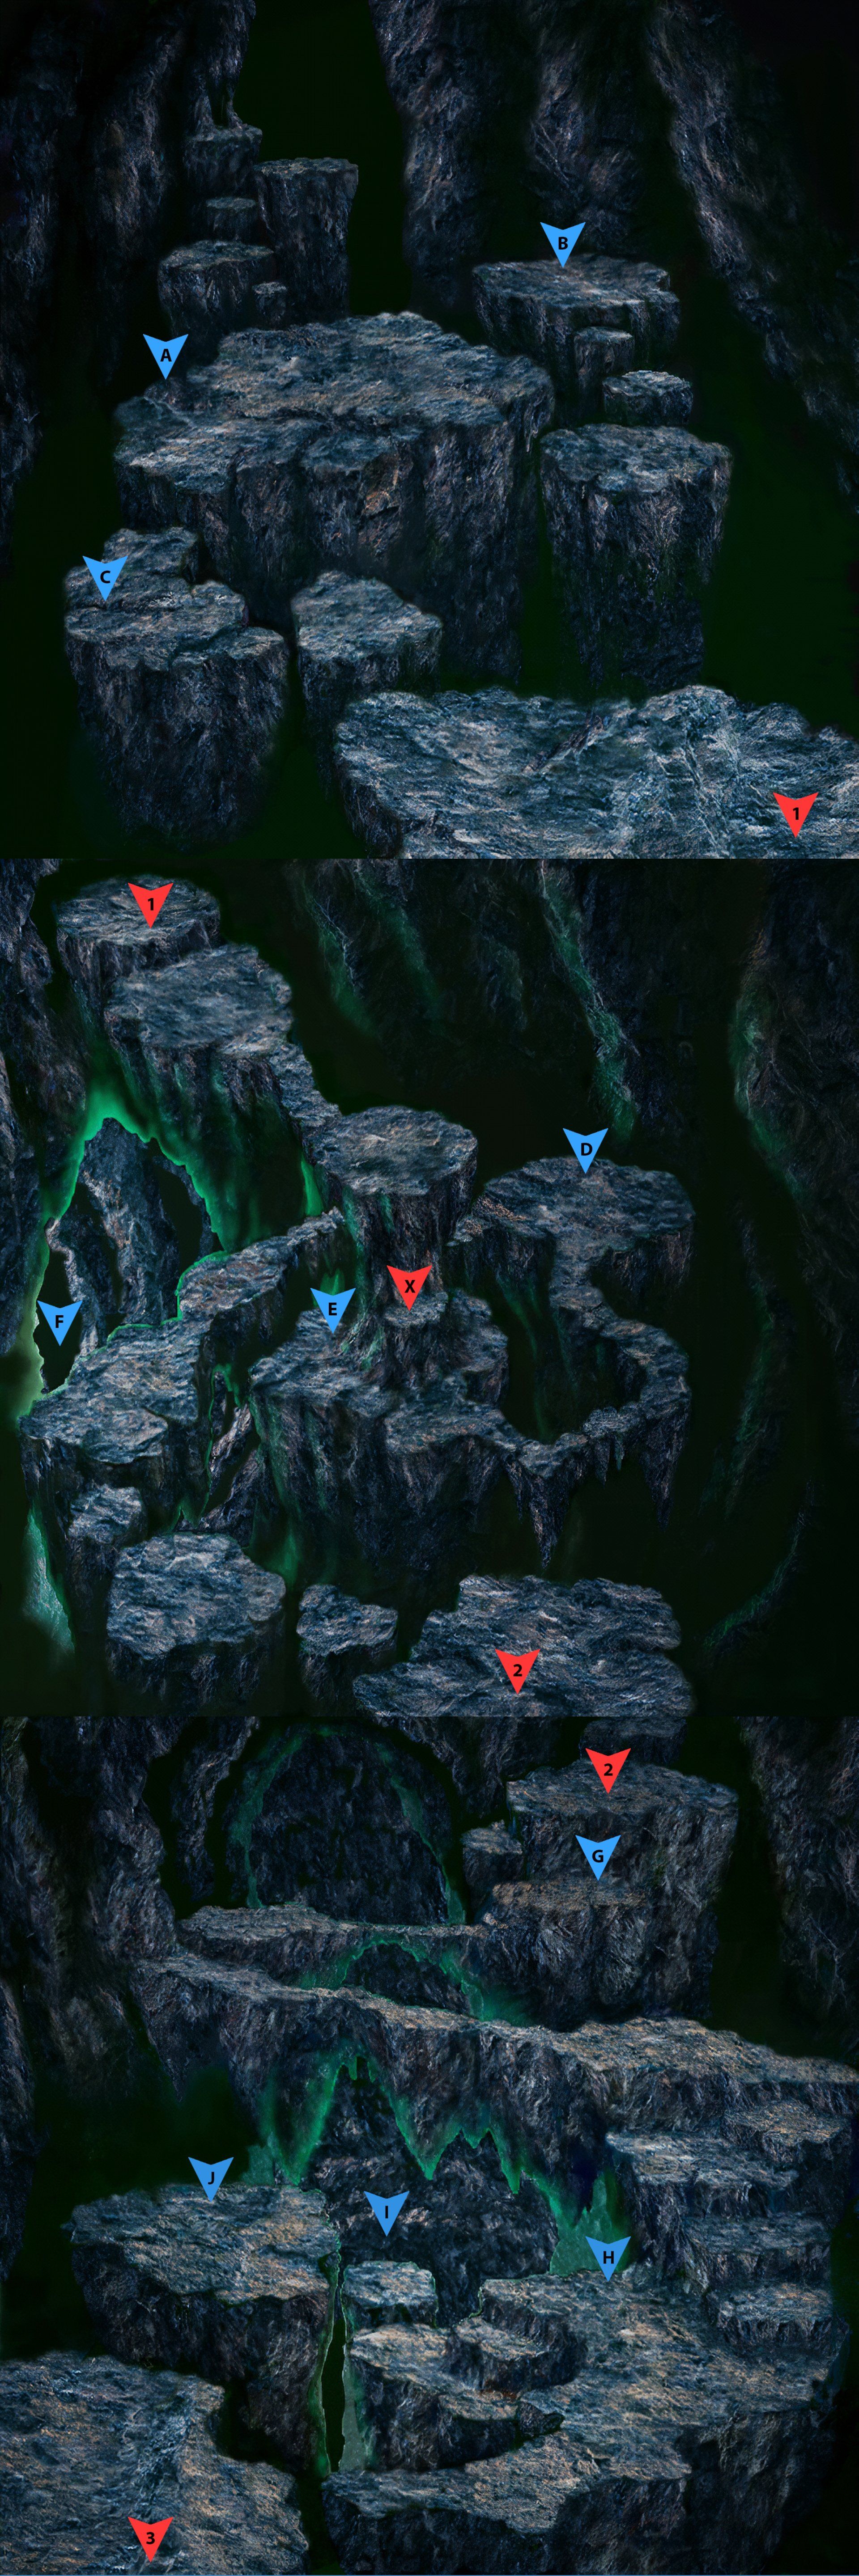
You are now on a huge train track that dips and rises, as you run along, you will fall off; there are 2 items you can collect a Wizard Staff (Left) and a Star Pendant (Right), hold the direction you want and keep pressing (OK) to move in the direction you want. Climb back up to collect the item and return to the main railway line.


On the line are some more items; W Machine Gun (A), Turbo Ether (B) and Transform Materia (C). Keep heading east until you reach a fork, head up (1) and you will see your party stuck at a bridge, run along the track until you get to a small shed, enter it and use the controls to lower the bridge.


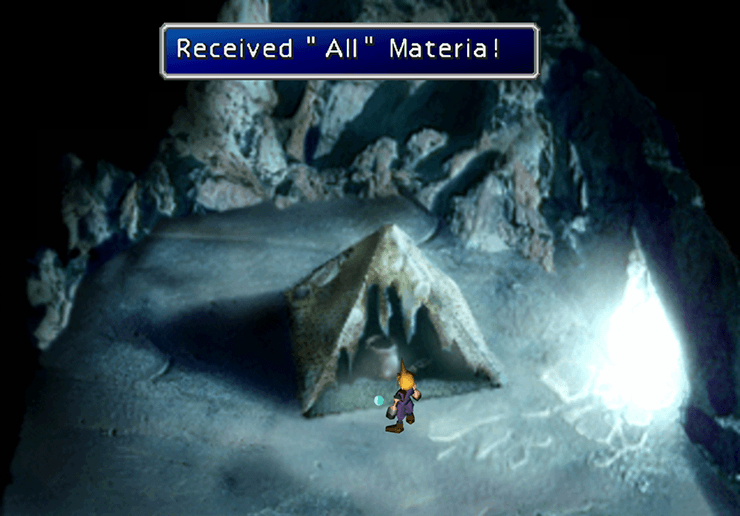
You can climb the wall near the shed which leads to a nest, inside you will find chicks surrounded by "Treasure", this treasure is 10x Phoenix Down which you can take, but if you do you have to fight an enemy.


Once done, head back and take the lower path (2), following your party from earlier. At the end of this track, there is a split, take a left and head down and under the track where you will find a hidden cave with some more items; Power Source, Mind Source and Tent. Head back out and up and exit by the other route to the right. Head along the bridge into North Corel.


FF7 North Corel

North Corel:


When you enter the town, Barret is already here and getting some heat from the townspeople. Speak to Barret and then enter the town.


At present, this is just a gateway to Gold Saucer but there are some shops here; A "Tool Shop" (A), a General Store (B), a Weapon Shop (C) and an Inn (D) where you can rest for 50 Gil.


Visit the shops, rest and head outside (2) to save if you wish but when you are done, head west (1) to the Ropeway to visit Gold Saucer.

Tool Shop (A) Price
Potion 50 Gil
Phoenix Down 300 Gil
Tent 500 Gil
General Store (B) Price
Transform (Materia) 5000 Gil
Maiden's Kiss 150 Gil
Cornucopia 150 Gil
Soft 150 Gil
Hyper 100 Gil
Tranquilizer 100 Gil
Weapon Shop (C) Price
Carbon Bangle 800 Gil
Force Stealer 2200 Gil
Molotov 400 Gil

Gold Saucer:


[Quest Options: Gold Saucer Date, Turtle's Paradise]


Before getting on the Ropeway, Barret will give a bit of a backstory to his hometown, Corel.


Once you arrive at Gold Saucer, speak to the person standing by the fat Chocobo, you will need to buy a pass, either a Day Pass for 3,000 Gil or a Life-time pass for 30,000 Gil. Most likely, you will only have the funds for a day pass, so buy it and enter the park.


Once inside, after a short scene, you can choose someone to go around with, the first person you choose will get a boost in the Dating mechanics (Except Red XIII). Dating Choice.


Head to Ghost Square and enter the Haunted House for a shop and an Inn to rest at if you need it (5 Gil to rest). There is also another Turtle's Paradise Poster here.


Head to Speed Square (1) and talk with Dio, the owner of Gold Saucer, who will ask about Black Materia.

Item Shop Price
Potion 50 Gil
Phoenix Down 300 Gil
Ether 1500 Gil
Antidote 80 Gil
Maiden's Kiss 150 Gil
Cornucopia 150 Gil
Soft 150 Gil
Echo Screen 100 Gil
Hyper 100 Gil
Tranquilizer 100 Gil
FF7 Gold Saucer Wonder Square

Next, head to Wonder Square and another conversation with a fortune teller named [Cait Sith]. He will tell your fortune and join your party to see if it comes true.


Now, there are a few things you can do:

  • Enter the Wonder Square Arcade (2) to earn some GP on the arcade games
  • Head to the Chocobo Races to earn some GP
  • Use your GP at the Speed Square on the Coaster
  • Go on the Ferris Wheel at Round Square

When you are done, head to Battle Square (3) to continue.


Upon arriving at Battle Square, you will see a Shinra soldier collapse, after a scene where you are accused of murder and are sent to Corel Prison.


Corel Prison

FF7 Corel Prison

Exploring the Prison:


[Items to find: Ramuh Mataeria]

[Quest Options: Gold Saucer Date]


When you enter the prison, you will see Barret, after a brief conversation, follow him into the prison.


There are people to talk to and a save point, be careful of Bandits, they will steal your Gil and Items in battle and if they run away, those are lost, but if you can defeat them quickly, you will recover them.


Head to the house (1) and Barret will explain about the other man with a gun-arm. After a flashback, choose a 3rd party member to join Cloud and Barret in confronting Dyne, Barret's friend. Your choice of party member will have an impact on the Dating mechanics. Dating Choice.


There is a General Store (A) if you need anything. There is also a converted trailer (B) where a man names Mr. Coates lives. He runs the town along with an unknown man and says you can escape by winning a Chocobo Race, but won't let you until you kill the boss.

General Store (A) Price
Potion 50 Gil
Phoenix Down 300 Gil
Tent 500 Gil

Head back North to where you entered the Prison and through the gate in the north-west; there is another man dead on the ground in front of it.


On the next screen, head east through the gap in the fence then continue east. 


If you want, you can go west but this is a desert with tough monsters and as you move from screen to screen, you will find on way back. Only when a Chocobo-drawn cart comes along can you get back to the entrance.


There is a Boss fight coming up where only Barret will be fighting, make sure he is equipped with Materia and any Weapons, Armour and Accessories.


You will arrive at a scrap pile, head north to see Dyne.


Tips:


Barret only fight.


Watch your HP as Boss deals decent damage.


Boss will start by using Needle Gun until he loses 25% HP then he will use S-Mine. When he reaches 50% he will use both attacks in the same turn.


When Boss HP is under 25% he will use Needle Gun then Molotov Cocktail.


When Boss HP is depleted, he has a 50% chance of using Molotov Cocktail as a final attack, so watch your HP.

Boss Fight: Dyne (Level: 23)

Statistics
HP MP Attack Mag
Attack
Def Mag
Def
Dex
1200 20 32 25 64 250 55
Elemental Affinity
Fire Ice Lightning
100% 100% 100%
Earth Poison Gravity
100% 100% 0%
Water Wind Holy
100% 100% 100%
Rewards
Items Gil EXP AP
Silver Armlet (Armour) 750 600 55
Other Details
Morph Attacks Steal
None Molotov Cocktail, Needle Gun & S-Mine None

FF7 Chocobo Lounge

After the battle, Dyne will give Barret a pendant to give to his daughter, Marlene, and then fall off the cliff.


Next morning, you will go to see Mr. Coates and he will arrange a Chocobo race for you to compete in for your freedom; you will also meet a woman named Ester who will act as your Manager.


As you go up the elevator, Ester will explain how to ride a Chocobo in a race if you want to hear it. You now enter the Chocobo Jockey's lounge, there is a Ramuh Summon Materia here (C), after a short period of time, an announcement is made for the next race. Ester comes back to say that you are in the race and gives a few final pointers.

FF7 Chocobo Race

Chocobo Race:


If you select Manual (Assist/Select Button) then you will need to control the Chocobo, controls below:


  • Left / Right - Steer the Chocobo's position on the path (you go around corners automatically)
  • (Switch) - Increase the speed of the Chocobo
  • (Cancel) - Decrease the speed of the Chocobo
  • (OK) - Causes the Chocobo to sprint

Keep an eye on your stamina (D) as if it depletes, the Chocobo will walk and you are guaranteed to lose.


Tips:

  • Manual control is best so you can control the speed of the Chocobo and keep the stamina for the race.
  • Increasing the Chocobo's speed too high causes the stamina to decrease, there is a speed where the stamina does not decrease.
  • Do not boost too much, this uses a lot of stamina.
  • On the corners, try to get as close to the inside as possible i.e. If the corner is a left, steer to the left before the corner to get as close to the edge of the track.

If you lose the first time, you get another go with a faster Chocobo but it is possible to win on the first go.


When you win, Ester will give you a letter from Dio pardoning everyone and giving you a gift; A Buggy!


Optional: Aeris' Great Gospel Limit Break


FF7 Gongaga River Crossing Point

Gongaga Town:


[Items to find: Titan Materia, Deathblow Materia, X-Potion, White M-Phone]

[Quest Options: Gold Saucer Date, Fort Condor Battle]


If you are doing the Fort Condor battles, you can head back to Fort Condor now (Head to Costa del Sol and enter the town in the buggy. Head to the dock and sail back to Junon. When you leave Junon you will be in the buggy and can head to Fort Condor.)


From Gold Saucer, head south across the river where there is a shallow point (Indicated by the water being a light blue).


Tip: Before entering the town, make sure you are prepared for a Boss Fight. They use fire magic, so Fire ring or Fire-Elemental Materia's on Armour to protect against damage.


There is a small town surrounded by a forest, exit the Buggy and enter the town.


As you walk in, the Turks can be seen talking about who they like, following this is a Boss fight against Reno & Rude.

Tips:


Watch their HP carefully; if one is defeated, the other will flee on the next turn if not defeated. This will also only give rewards for the one defeated and not the one who fled.


Rude can use Cure to heal himself and Reno.


Rude will only attack Tifa if other party members are KO'd; he will only use his Shoulder Attack and has a 1/3 chance of not attacking at all.

Boss Fight: Reno (Level: 22) / Rude (Level: 23)

Statistics
HP MP Attack Mag
Attack
Def Mag
Def
Dex
2000 / 2000 80 / 135 35 / 40 35 / 35 66 / 100 164 / 200 69 / 65
Elemental Affinity
Fire Ice Lightning
100% 100% 100%
Earth Poison Gravity
100% 100% 0%
Water Wind Holy
100% 100% 100%
Rewards
Items Gil EXP AP
Fairy Tail (Weapon)
X-Potion (Consumable Item)
1500
2000
660
720
60
70
Other Details
Morph Attacks Steal
None Reno: Electroprod & Turk Light
Rude: Cure, Fire & Shoulder Attack
None

FF7 Gongaga Full Map

After the fight, head north (1); this leads to an abandoned Mako reactor. After taking a few steps along the road, Scarlet and Tseng arrive and Cloud hides behind the reactor.


After they leave, inspect the area Scarlet was looking at to find a Titan Summon Materia (A). Exit the reactor and head west on the path where you fought Turks (2). There is a Deathblow Materia here (B) and an exit to the map past the Materia. Head into the village (3) and after a short scene, you can explore the village and talk to the people.


There is an Inn in the top left (C) where you can rest for 80 Gil and there is also an X-Potion in a chest. The house next door (D) has a White M-Phone.


There is an Accessory Shop and Weapon Shop (E) (There is a pole you can climb to access the weapon shop) and there is also an Item Shop (F).


Finally, there is a house in the bottom right (G) that belongs to the parents of a man named Zack. If you have Aeris and Tifa in your party when you visit here, you find out that Aeris was Zack's Girlfriend and you can talk to Tifa as well. (This has an effect on the Dating mechanics). Dating Choice.


After you are done here, leave Gongaga and head back to the Buggy and head west towards Cosmo Canyon.


Note: If you are doing the Fort Condor battles, DO NOT go all the way to Cosmo Canyon in the buggy as it will break down making it impossible to get back to Fort Condor. Go about half way then walk the rest to keep the Buggy alive.

Accessory Shop (E) Price
Headband 3000 Gil
Silver Glasses 3000 Gil
Star Pendant 4000 Gil
Talisman 4000 Gil
White Cape 5000 Gil
Fury Ring 5000 Gil
Mystify (Materia) 6000 Gil
Time (Materia) 6000 Gil
Heal (Materia) 1500 Gil
Transform (Materia) 5000 Gil
Weapon Shop (E) Price
Hardedge 1500 Gil
Grand Glove 1200 Gil
Atomic Scissors 1400 Gil
Striking Staff 1300 Gil
Diamond Pin 1300 Gil
Boomerang 1400 Gil
Impaler 500 Gil
Shrivel 500 Gil
Molotov 400 Gil
Item Shop (F) Price
Potion 50 Gil
Hi-Potion 300 Gil
Phoenix Down 300 Gil
Tent 500 Gil
Maiden's Kiss 150 Gil
Cornucopia 150 Gil
Soft 150 Gil
Hyper 100 Gil
Tranquilizer 100 Gil

FF7 Cosmo Canyon

Cosmo Canyon:


[Quest Options: Gold Saucer Date, Fort Condor Battles, Turtle's Paradise]


West of Gongaga is Cosmo Canyon, home of Red XIII. Talk to the man by the entrance and say "No" to his question. After a brief conversation, you gain entrance to the town.


Head to the Inn (A) if you need to rest (100 Gil) and there is also an Elixir in the room upstairs, look in the corner where there is a barrel (Bottom Left corner). Outside of the room is a Turtle's Paradise poster.


There is a General Store up the ladder (B) if you need supplies.


Head towards (1) and talk to Red XIII, he will give a bit more of his story and head inside. Your party splits up here, but follow them inside. If Barret is in your party, you can talk to him in the room behind the weapon shop, this is part of the Dating mechanics. Dating Choice.


Here you will find the Weapon Shop (C), a Save Point and another Turtle's Paradise Poster on the wall to the left of the shop. Tip: Do not buy a Green M-Phone as you can get a free Black M-Phone later.


Head up the stairs and to the left (2), follow the stairs up to (3), inside is a ladder (4) leading up to the peak of the canyon, a Materia Shop (D) and a door that is sealed shut.


Head up to the peak (4), and enter the house here. This is Bugenhagan's home, he is the elder of the town. Talk to Red XIII and you will get some more backstory.


After this, you will get the chance to see Bugenhagen's equipment; but you will need to find another person to come with you, you can find them at the locations below:

General Store (B) Price
Potion 50 Gil
Hi-Potion 300 Gil
Phoenix Down 300 Gil
Ether 1500 Gil
Tent 500 Gil
Maiden's Kiss 150 Gil
Cornucopia 150 Gil
Soft 150 Gil
Hyper 100 Gil
Tranquilizer 100 Gil
Weapon Shop (C) Price
Butterfly Edge 2800 Gil
Tiger Fury 2500 Gil
Heavy Vulcan 2700 Gil
Prism Staff 2600 Gil
Silver Barrette 2500 Gil
Pinwheel 2600 Gil
Green M-Phone 2400 Gil
Silver Armlet 1300 Gil
Materia Shop (D) Price
MP Plus 8000 Gil
HP Plus 8000 Gil
Mystify 6000 Gil
Transform 5000 Gil
  • Barret is in the room behind the Weapon Shop (E)
  • Aeris and Tifa are at the Inn (A)
  • Cait Sith is in the room to the right of the Materia Shop (F)
  • Yuffie is in the Materia Shop (D)
  • Red XIII is in the Inn, in a room under the stairs, but does not want to go with you as he has "Seen it before".


Once you have chosen, head back to the top of the canyon. Enter the house and into the room at the back, where Red XIII was standing earlier.


Talk to Bugenhagen to begin the scene where he explains about the planet, the Lifestream and the Mako reactors.


Once done, talk to him again then head back to the centre of town, to the fire called the Cosmo Candle (G) where your party are waiting. Talk to each of them for some story, but talk to Red XIII last. He will talk about his past and Bugenhagen appears and asks you to form a party with Red XIII and one more member to accompany him to the Cave of the Gi.


[Fort Condor Battle]


There is a Boss fight soon, make sure you are prepared.

FF7 Cave of the Gi Part 1

Cave of the Gi:


[Items to find: Added Effect Materia, Black M-Phone, Ether, X-Potion, Fairy Ring, Turbo Ether, Gravity Materia]


Upon entering the cave, head down the ladders and ropes to the very bottom and exit into the cave to the right.


In this room, there are a few caves in the walls, each cave has a rock that you can smash, all but 1 has an enemy to fight inside, the one shown (A) has a switch that opens the hidden door (1).


Enter the door and head left towards (2) to get the Added Effect Materia (B). Be careful of the golden stuff on the floor as this is slippery so only walk on this, do not run as you will slip into spikes.


After you have the Materia, head back through (2)  to the main room, head back towards (1) but go north, at the next fork, take a left and head down the stairs (3) to get to a chest (C) with a Black M-Phone in it. Head back to the stairs but go to the right of them to get to another chest (D) which has an Ether.


Head back up the stairs and then north to exit this area (4).

FF7 Cave of the Gi Part 2

On the next screen, you will be faced with 5 tunnels. This is not as complicated as it looks, 2 tunnels will just send you in a circle, go in a tunnel marked (1) and you will come out at the other one marked (1). The middle tunnel is blocked and goes nowhere.


Go through tunnel (2), walk into the web for a battle against a Stinger and head up to the chest (A) with an X-Potion. Now head back and take the tunnel (3) and another fight with a Stinger.


Head up and then left at point (4), run down and, as you run through the tunnel, keep to the right to get to the chest (B) which is a Fairy Ring, go back up the tunnel to point (4) and touch the web for the final Stinger fight. 


After the fight, before going to the exit, head left past the rock (5) to a secret tunnel leading to (C) which is a Turbo Ether. Exit at the top of the cave (6).


In this last room, there is a Boss Fight, make your preparations before approaching the statue.


Tip: Equip a Fire Ring or Fire-Elemental Materia combination to armour to negate/reduce the damage from fire attacks.

Tips:


Boss is Undead; this means it can be 1-Hit KO'd by using an X-Potion, Elixir or Megalixir. Life Magic and Phoenix Down can also do this but have a 3/4 chance of missing.


Equipping a Fire Ring or Fire and Elemental Materia to Armour can help resist fire damage.


Boss can use Drain to steal HP & MP from party members.


Boss has 2 allies called Soul Fire which can possess your party members and deal fire damage over time.

Boss Fight: Gi Nattack (Level: 29)

Statistics
HP MP Attack Mag
Attack
Def Mag
Def
Dex
5500 200 70 25 70 140 75
Elemental Affinity
Fire Ice Lightning
100% 100% 100%
Earth Poison Gravity
0% 100% 0%
Water Wind Holy
0% 100% 200%
Rewards
Items Gil EXP AP
Wizer Staff (Weapon)
Gravity (Materia) *
3000 1400 150
Other Details
Morph Attacks Steal
None Aspil, DeBarrier, Drain & Take Over None

(*) Gravity Materia is on the floor where the Boss was.


FF7 Cave of the Gi After Boss Fight

After the battle, follow everyone outside, but remember to collect the Gravity Materia on the ground as you go.


After a scene where the truth about Red XIII's father is told, you must choose your party to continue on your journey.


Make sure you have everything you need, stock up then head to the exit of town, Red XIII will arrive saying he is going with you and then you all leave.


[Fort Condor Battle] Before heading to Nibelheim, you can do another Fort Condor battle but this one can be done up until Rocket Town. As Cosmo Canyon is closer tan Rocket Town, I would suggest doing it now.


Hop in the Buggy and head north-west to Nibelheim.


FF7 Nibelheim

Nibelheim:


[Items to find: Luck Source (2), Elixir, Platinum Fist, Turbo Ether]


Upon entering Nibelheim, the town is just as it was as if it had never burned down all those years ago.


There are men in black capes everywhere and each has a number tattooed on them.


Head to the Inn (1) and talk to the receptionist, if you ask about the town he will say that it never burned down. To the left of the desk is a door to the back room where one of the black caped men is, talk to him to get a Luck Source.


Next door is the General Store (2), there is a person at the back who will say similar things to the innkeeper and on the right, there is another man in black with an Elixir.


You can talk to the person in Cloud's old house and in Tifa's house (3) are a few men in black, the one in the kitchen will give you a Turbo Ether. Head upstairs and in one room is a man in black who will give you a Platinum Fist.


In the last house (4), head upstairs and talk to the big man in black to get another Luck Source.


Head out and go to Shinra Mansion (5) where two more men in black are.


Go inside Shinra Mansion.

General Store (3) Price
Potion 50 Gil
Hi-Potion 300 Gil
Phoenix Down 300 Gil
Tent 500 Gil

Shinra Mansion:


[Items to find: Twin Viper, Silver M-Phone, Magic Source, Enemy Launcher, Odin Materia, Destruct Materia]


Inside the Mansion there are enemies to fight this time around.


Read the notes to the left of the entrance (A), on the note, you will get clues to a code you will need later:


"Move the dial on the safe carefully but quickly. You have 20 seconds. You can not go past the number while turning. The 4 hints for the numbers are..."

  • The lid of the box with the most oxygen.
  • Behind the Ivory's short of tea and ray.
  • The creek in the floor near the chair on the second floor... Then to the left five steps, up nine steps, left two steps, and up six steps
  • [Invisible Option] Read it for the 4th combination.

There are 3 doors on the ground floor, head through the central door (1) and head right into the small room with a chest (B), this is a Twin Viper.


Head back to the main room and go into the right door (2) and into the room here with a Silver M-Phone (C)


Head back to the man room and into the left door (3) and check around the Piano for a code.


Now, back to the main room and up the stairs, head right first (4) and there is a room with a chest (E) Magic Source.


Now go down to the room with the hidden staircase to the library from the flashback and stand in front of the chair (F) if you press (OK) Cloud will look down and a noise will sound. Follow the instructions from the clue above to find the clue.


Finally, head left of the staircase and into the room with a chest (G) and plants, open the chest for an Enemy Launcher. Examine the box again for the final clue.


Prepare for a Boss Fight.

Now, examine the safe in the room behind (H) and enter the combination from the clues; you have 20 seconds to enter the combination and you can't go past the number. If the combination is Right 36 and you go to 37, you can't go back a number.

Once you have the safe open, a Summon Materia will come out as well as a Boss.
SPOILER: This is the combination for the safe, hover your mouse over the black box to the right - Right 36, Left 10, Right 59, Right 97

Tips:


Boss has 3 forms, it will start in its Base form but when it gets below 50% HP it will change depending on what damage caused it to drop below 50% and this will change its attacks and stats.


(*) Magic form increases Magic Attack to 55 and Magic attack to 440 but lowers physical defence to 40.

Physical form increases Attack to 140 and Defence to 400 but lowers Magic Defence to 200 and Magic Attack to 5.


Aeris' Seal Evil LIMIT BREAK can cause paralysis as can Choco/Mog Summon.


Lost Blow is a powerful attack that hits one target.

Boss Fight: Lost Number (Level: 35)

Statistics
HP MP Attack Mag
Attack
Def Mag
Def
Dex
7000 300 80 * 35 * 120 * 280 * 82
Elemental Affinity
Fire Ice Lightning
100% 100% 100%
Earth Poison Gravity
100% 100% 0%
Water Wind Holy
100% 100% 100%
Rewards
Items Gil EXP AP
Cosmo Memory (LIMIT BREAK)
Odin (Materia)*
2000 2000 80
Other Details
Morph Attacks Steal
None Normal: Bolt2 & Punch
Magic: Aspil, Bio2, Bolt2, Quake2 & Tentacle
Physical: Lost Blow & Punch
None

(*) Odin Materia comes out of the safe after battle.


FF7 Nibelheim to Mt. Nibel

After the battle, pick up the Basement Key from the safe and the Odin Summon Materia that came out of the safe and make your way to the secret basement as you did in the flashback.


In the basement, there is a door you could not go inside in the flashback, just before the Library, with the basement key, you can now go in and see a few coffins.


Examine the one in the middle and a man will wake up and you can talk to him about Sephiroth. He will go back to sleep but if you examine it again and ask him who he is, you will find he is an Ex-Turk named [Vincent]. This is all you can do here, so proceed on to the library.


Inside the library, go to walk up to the back room and a scene will play with Sephiroth. Afterwards, he will throw a Destruct Materia at you and fly away, saying he is headed to Mt. Nibel.


Leave the library and head towards the exit, as you do, Vincent will call out to you and will join your party.


Leave the Mansion, rest at the Inn if you need to and head out towards Mt. Nibel (1).


FF7 Mt. Nibel Entrance Maze

Mt. Nibel:


[Items to find: Rune Blade, Plus Barrette, Poersoul, All Materia, Counter Attack Materia, Elixir, Elemantal Materia, Sniper CR]


After leaving Nibelheim via the exit behind Shinra Mansion, you can save on the world map.


Head north to Mt. Nibel.


This first section of the mountain is quite linear, but there are a couple of items off the main road, there is a path (1) where you can get to the item box (A) which has a Rune Blade.


Back to the main road and continue along until the bridge, there is a more hidden path here (2) which leads up the mountain to another item (B) a Plus Barrette.


Head back to the bridge and cross it.

FF7 Mt. Nibel Tubes and Boss Room

This next area has a number of tubes you can slide down, but before you do, there is a ladder (1) that is folded up, go down towards the ladder and climb on it to make it un-fold; now head back to the top.


There are 5 tubes here, if you have pushed the ladder down then you can go back to the top and get all of the items:

  • #1 - Leads to the bottom in front of the Boss
  • #2 - Leads to a small ledge with a Powersoul (A)
  • #3 - Leads to the second level
  • #4 - Leads to a chest with an All Materia (B)
  • #5 - Also leads to the second level

Prepare for a Boss Fight.


There is a giant monster in the room, this is the boss and won't attack until you touch it, if you hug the wall you can get past it to the save point if you need it.


Tip: Do not use Fire magic, this Boss heals with fire.

Tips:


Boss absorbs Fire Magic.


Boss can cast Trine which is a powerful attack but is also an Enemy Skill you can obtain.


Choco/Mog can cause Stop on the Boss as can using Time Materia Linked with Added Effect on a weapon for 1/5 chance of causing Stop with physical attacks.


Odin Summon, Aqualung Enemy Skill and Quake2 are effective against Boss.


Do not use Galian Beast LIMIT BREAK with Vincent as this is Fire damage.

Boss Fight: Materia Keeper (Level: 38)

Statistics
HP MP Attack Mag
Attack
Def Mag
Def
Dex
8400 300 90 12 100 280 90
Elemental Affinity
Fire Ice Lightning
-100% 100% 100%
Earth Poison Gravity
100% 100% 0%
Water Wind Holy
100% 100% 100%
Rewards
Items Gil EXP AP
Jem Ring (Accessory) 2400 3000 200
Other Details
Morph Attacks Steal
None Big Horn, Cure2, Hell Combo & Trine* None

FF7 Mt. Nibel Caves

After the battle, collect the Counter Attack Materia from the floor where the boss was then save and heal if you wish.


Exit via the route at the bottom (2 of previous picture) and jump down to the ledge below and enter the cave here. This is a cave from the flashback. Follow the path to the top and where the (1) is there is a hidden path, enter the cave and navigate your way down to the exit where there is a Elixir (A).


Head back to the top and exit via (2). You are now at the Materia Fountain, to the left of the fountain is an Elemental Materia (B), exit via (3).


In this cave, head right then up, at the fork, head left to collect the chest (C) which is a Sniper CR. head back to the fork and head right down to (4).

You now emerge at the bottom of the path to the reactor, follow the path up to the reactor.


When you reach the reactor area, head behind the reactor and you will find a door, enter the door and you will be back to the room where you fought the Boss.


Head down to the bottom, save and heal if you need and exit the caves where the boss used to be.


Follow the mountain path and exit Mt. Nibel.


You are now out of Mt. Nibel and are off to Rocket Town.


FF7 Rocket Town

Rocket Town:


[Items to find: Power Source, Drill Arm, Yoshiyuki]

[Quest Options: Fort Condor Battles]


Head west then north after the mountains; you will see a town in the distance, head towards it.


Upon entering, you will see a huge rocket in the middle of town, you can explore the town where you find a Weapon shop (1), an Inn (2) and an Item shop (3)


There are also a few items to find, enter the house (A) and in the kitchen to the right is a chest with a Power Source. The house (B) has a Drill Arm in a chest in the room right in front of you. You can go out the back of this house where you meet Shera, the "Captain's" assistant and you find a machine called the Tiny Bronco.


[Fort Condor Battle] - This battle must be done after talking to Shera here.


Head back out to the town and talk to the man outside the Item shop a few times and choose to look at the rocket with him. He will give you Yoshiyuki.


Once done in town, head towards the rocket (4).

Weapon Shop (1) Price
Shotgun 3100 Gil
Gold Armlet 2000 Gil
Power Wrist 7500 Gil
Protect Vest 3500 Gil
Earring 7500 Gil
Talisman 4000 Gil
Item Shop (3) Price
Potion 50 Gil
Hi-Potion 300 Gil
Phoenix Down 300 Gil
Ether 1500 Gil
Hyper 100 Gil
Tranquilizer 100 Gil
Tent 500 Gil
Barrier (Materia) 10000 Gil
Exit (Materia) 10000 Gil
Time (Materia) 6000 Gil
FF7 Rocket Town Rocket

At the rocket, follow the markers (5) to reach the top of the rocket and head inside.


Talk to the man here, who introduces himself as the "Captain"; his name is [Cid].


Talk to him about the rocket, Rufus and the Tiny Bronco then head back to his house (B). Inside, head towards the back of the house and Shera will talk to you. Cid will come back and get annoyed at Shera. After Cid goes out back, Shera will tell you why he is mad at her.


After the flashback, Palmer will arrive and announce that Rufus is here (Plus, asks for tea with sugar, honey and LARD?!).


Head outside and after a scene, Shera will call you back inside. Prepare for a Boss fight with Palmer.


When you are ready, head out the back to the Tiny Bronco.

Tips:


Palmer is quite weak but is able to be inflicted with Stop.


Boss is weak to Sleep damage but not Sleep status effect. An attack that can cause Sleep will deal extra damage; If you have the Seal Materia, link it with Added Effect on a weapon to deal added damage.

Boss Fight: Palmer (Level: 38)

Statistics
HP MP Attack Mag
Attack
Def Mag
Def
Dex
600 240 100 25 100 200 60
Elemental Affinity
Fire Ice Lightning
100% 100% 100%
Earth Poison Gravity
100% 100% 0%
Water Wind Holy
100% 100% 100%
Rewards
Items Gil EXP AP
Edincoat (Accessory) 5000 1800 98
Other Details
Morph Attacks Steal
None Mako Gun: Bolt2, Fire2 & Ice2 None

FF7 Western Island Tiny Bronco Landing Area

After the battle, Cloud and your party will board the Tiny Bronco but can't stop it. After a scene where Cid jumps on board and the plane crashes, you have access to the Tiny Bronco to use in shallow water.


[Fort Condor Battle] - This battle can be done up until you go back to Gold Saucer but since you have the Tiny Bronco, you should do it now.


You can now visit Wutai on the western island, but to get there, you will need to travel down the island a bit and then walk up, see image for location (A).


As you proceed up the island, Yuffie will arrive and tell you that it gets tricky here but you are interrupted by Shinra soldiers and a battle starts... but you have no Materia!


After the fight, head north and cross the bridges, and after the second bridge, head left and around under the bridge. Follow the path up to another bridge, cross it and follow the coastline north, eventually you will reach Wutai.


Wutai:


[Items to find: Magic Shuriken, Hairpin, MP Absorb Materia, Elixir, Swift Bolt, HP Absorb Materia]

[Quest Options: Gold Saucer Date, Turtle's Paradise]


Upon entering Wutai, Yuffie will call out to you and run off. You will have to find her if you want your Materia back...


There is a Weapon shop (A), an Item shop (B) and Turtle's Paradise Bar (C).


For now, head to North Wutai (1) and go to Lord Godo's House (D). Inside, the first room you can rest in for free, examine the wall to the left for a secret passage leading to a chest with a Magic Shuriken 


If you go right in the house and follow the hallway around, you will find a man sleeping, enter the room and talk to him a few times and Yuffie will appear again and run away again.


After she runs away, go to the room next to Godo's room and examine the wall for a secret passage leading to a Hairpin.

Weapon Shop (A) Price
Murasame 6500 Gil
Diamond Knuckle 5800 Gil
Chainsaw 6300 Gil
Aurora Rod 5800 Gil
Gold Barrette 6000 Gil
Slash Lance 6500 Gil
Blue M-Phone 5500 Gil
Razor Ring 6000 Gil
Shortbarrel 6400 Gil
Item Shop (B) Price
Hi-Potion 300 Gil
Phoenix Down 300 Gil
Ether 1500 Gil
Hyper 100 Gil
Tranquilizer 100 Gil
Tent 500 Gil
Fire Veil 800 Gil
Swift Bolt 800 Gil
Choco Feather 10000 Gil

Head back to the town and in the Item shop (B) is a chest with an MP Absorb Materia, which Yuffie immediately steals from you...


Head to the house by the entrance (E) and examine the screen, Yuffie is hiding behind it, then runs away.


Head over to Turtle's Paradise (C) and you will see the pot outside wobble, examine it and Yuffie will come out but your party have blocked off the exits, so she gives up. After a scene, Yuffie will take you to her base, follow her down the stairs and talk to her, she will tell you to pull the lever on the left. No matter which you pull, you will fall into her trap. Yuffie runs off again, pull the switch again to free your party and head outside.


Head back to North Wutai (1) and examine the bell to the left (F) and a hidden door (3) will appear, head into the door.


Upon entering the room, you will see Yuffie in a bind and Don Corneo; he has abducted Yuffie and Elena of the Turks. There are two chests in here with an Elixir and a Swift Bolt. Follow them out of the room.


After leaving Godo's house, you will find Rude & Reno of the Turks, talk to Reno and you will agree to a temporary truce. Head back to the main town, stock up as a Boss fight is coming up (Without Materia; consider some Fire Veil's and Swift Bolt's) and head to Da-Chao (2).

FF7 Wutai - Da-Chao Statue

Run up to the Turks and after a short conversation, head up to the first fork in the road (1) and head north, keep going up and run around behind the head of the statue (2).


On the next screen, you will see Rude just above you, walk up to him and follow him into the cave (3). Inside are a few items but you can only get 1 at present; Dragoon Lance (A). Talk to Rude and follow him back out of the cave, remember where it is as we will be back later in the game.


Head down (4) and you will find Yuffie and Elena strapped to the face of Da-Chao with Don Corneo.


After a short conversation, you are faced with a Boss Fight.

Tips:


You do not have Materia for this fight; this makes it tough but manageabe.


Aeris' Healing Wind LIMIT BREAK is useful here.


There are items in Wutai that will be useful as they can be used to cast magic such as Fire3 and Bolt3.


Boss can use Aero3 which can deal a lot of damage.

Boss Fight: Rapps (Level: 39)

Statistics
HP MP Attack Mag
Attack
Def Mag
Def
Dex
6000 300 90 55 58 400 120
Elemental Affinity
Fire Ice Lightning
100% 100% 100%
Earth Poison Gravity
100% 100% 100%
Water Wind Holy
100% 100% 100%
Rewards
Items Gil EXP AP
Peace Ring (Accessory) 20,000 3200 33
Other Details
Morph Attacks Steal
None Aero3, Scorpion's Tail & Wing Cut None

FF7 Wutai - Yuffie's House Location

After the battle, the Turks will arrive and "deal" with Corneo.


Back at Yuffie's base, she gives you back your Materia and gives you an MP Absorb Materia.


You will now appear outside Wutai, but don't leave yet, head back in and you can now visit the Weapon shop. Head to Yuffie's house (1) in the top right corner and head into the basement. There is a Turtle's Paradise poster on the wall. Go outside her house, down the stairs and into the door under her home (2). You can climb the stairs and walk towards the screen for a chest with a HP Absorb Materia.


If you have read all of the posters as you have been going through, head over to Turtle's Paradise, read the poster outside then and speak to the bartender for your prizes of: Power Source, Guard Source, Magic Source, Mind Source, Speed Source, Luck Source, and Megalixir.


Optional: Use your PHS at the save point to get Yuffie in your party and make sure she is equipped ready for the Pagoda. After 5 Boss fights you will receive Leviathan Summon Materia. For full details, check the Side Quests.


When you are done, leave Wutai and head back to your Tiny Bronco in the south of the island (Back through the mountains). We will be back later for a few more items.


FF7 Weapon Seller Location

Weapon Seller:


[Quest Options: Fort Condor Battles]


Head back to the mainland and make your way east towards Gongaga, remember to pick up your Buggy from Nibelheim if you haven't already.


[Fort Condor Battle] - Before going further, this is the opportunity to do another Fort Condor battle.


Just past Gongaga is a lonely house belonging to a man known as the Weapon Seller. Enter the house and talk to him, he will tell you he had an item called a Keystone that he sold to Dio, owner of the Gold Saucer.


Before leaving, you can rest here by examining the bed.


Now, head back to North Corel, which you can now get to without going through the mountains. Head north towards the Gold Saucer and then head north-west of the Gold Saucer between the mountains to North Corel.


Head up to the Gold Saucer via the ropeway.


FF7 Gold Saucer Keystone Room

Gold Saucer (Part 2):


[Quest Options: Fort Condor Battles]


Enter the Gold Saucer; depending on if you are planning on breeding and racing Chocobo's, you may want to drop 30,000 Gil for a lifetime pass. If not, just pay the 3000 Gil.


Head to the Battle Arena and head up the stairs. There is a man by the entrance who will explain the Battle Arena but your goal is to find Dio and the Keystone.


Head right into Dio's Show Room and examine the green item in front of you. Dio will come in and say you can have it if you entertain him. You will be put into the Battle Arena to fight, you don't need to do well, just get as far as you can.


You now have the Keystone. Go to leave and you will find out that the tram is out of order. Cait Sith will arrive and arrange accommodation in the Hotel.


After a scene with everyone in the lobby where you can explain to everyone what is going on, you retire to your rooms. After you go back to your room, a member of your party will arrive and ask you on a date. Throughout the game, choices in dialogue have made changes to who will come to your room; Aeris is the most likely so, for the rest of this section, we will be assuming the date is with Aeris.

FF7 Gold Saucer Date

The Date:


First stop is the Event Square; depending on who you are with, you may participate in the show as the "100th Couple". Just play along with the act and have some fun. (If you are with Barret, you won't do the show)


Last stop is the Round Square; you board the Gondola with your date and you can enjoy the sights of Gold Saucer, when they say something, look to your right (Left on the D-Pad). (If you are with Barret it is rather awkward).


After the date, you bump into Cait Sith who has the Keystone. Chase him around Gold Saucer but you can't catch him and he gives the Keystone to Tseng of the Turks. He was a spy all along and what's worse? He has taken Marlene hostage.


Once back in your room, open the doors of the Iron Maiden in the corner to receive an Elixir. Exit your room for a scene in the lobby, select your party and leave Gold Saucer.


Before heading to the Temple of the Ancients, this is the last opportunity to teach Aeris her final LIMIT Break; Great Gospel. Check the Character Bio for how to get the LIMIT Break.


[Fort Condor Battle] - Before heading to the Temple of the Ancients, there is another Fort Condor Battle to do.


FF7 Temple of the Ancients Shore

Temple of the Ancients:


Find your Tiny Bronco and head towards Nibelheim, there is a river here that the Tiny Bronco can go up, this take you out on the other side, near the Gold Saucer. Keep heading east towards the open sea. Follow the shallow water around, still heading east towards the south-west part of the first Island.


In the distance, you will see a forest and a temple, make sure you are prepared and then head in.


Start to walk across the bridge and a scene will play. At the top of the temple, a man in black walks out and collapses. Go up and examine him. Head inside.


Inside the temple, Tseng will be on the floor, he will say he has been tricked and give you the Keystone.

Place the Keystone on the Altar in front of you.

FF7 Temple of the Ancients - Labyrinth

Labyrinth:


[Items to find: Trident, Turbo Ether, Mind Source, Silver Rifle, Rocket Punch, Luck Plus Materia, Morph Materia]


Upon entering the Labyrinth, you will have a short scene and a man in purple run off, follow him and on the way you will collect a Trident (A) from a chest, a Turbo Ether (B) and a Mind Source (C).


Enter the room he ran into (1) and talk to him. There is a chest to your right with a Silver Rifle. Talk to him and you can Save, Rest and shop for Items.


This will allow you to grab the other items in the labyrinth while having a place to restore HP/MP.


The other items are Rocket Punch (D), Luck Plus Materia (E) and Ribbon (F), but this final one can't be obtained until a while later.


When you have collected everything you can, head to the door (2).

Item Shop (1) Price
Potion 50 Gil
Hi-Potion 300 Gil
Phoenix Down 300 Gil
Ether 1500 Gil
Hyper 100 Gil
Tranquilizer 100 Gil
Maiden's Kiss 150 Gil
Tent 500 Gil

In the next room, you will see rocks rolling towards you, these rocks are in a U shape. To get through, you must position yourself so that you are inside the gap as it goes over you.


Get the timing right and keep moving forwards to the centre where, to the left, is a purple fountain and a Morph Materia.


Continue along the path, dodging the stones (or you go back to the start) and when you get to the end, the rocks stop and the party talk for a bit and Aeris will run back to the fountain, follow her back.


A scene will play, showing Tseng and Elena in a room. After Elena leaves, Sephiroth appears and after some talking, Sephiroth will strike Tseng down.


Afterwards, head back to the right of the fountain, where the Ancient will be waiting who can restore your HP/MP.


Exit via the door here.

FF7 Temple of the Ancients Clock Room

Clock Room:


[Items to find: Princess Guard, Ribbon, Trumpet Shell, Megalixir, Nail Bat]


You start at the X Position (1), use (Menu) to move the hands manually, (OK) to spin the hands (Again to stop them) and (Cancel) to proceed.


See the table to the side for what each room leads to but there are a number of items inside. If you get knocked off by the second hand, you will fall off and have to fight an enemy but you can get a Nail Bat and be sent back to the start of the labyrinth.


After collecting the 4 items in here, one of which is the item we couldn't get from the labyrinth earlier, proceed to the VI Position (2) to exit into a new area.

Room # Leads to
I Enemy: Jemnezy, Toxic Frog (x2)
II Dead End
III Enemy: 8 Eye (x2)
IIII Princess Guard (A)
V Ribbon (B)
VI Door Maze
VII Trumpet Shell (C)
VIII Megalixir (D)
IX Dead End
X Rock Room
XI Dead End
XII Exit
FF7 Temple of the Ancients Guard Room

Guard Room:


[Items to find: Work Gloves, Bahamut Materia]

[Quest Options: Fort Condor Battles]


In this room there is an Ancient who comes out of the centre room and then runs away, you need to chase him down.


Every time you enter a hole, you will come out of a different one, he will do the same. The goal is to figure out which door he will come out of and meet him there.


The picture here will show where each hole goes. Each number 1-9 corresponds to a letter; 1-A, 2-B, 3-C etc. You can drop down a level using (OK) at certain spots on the ledge.


If he goes into door 3 he will come out of door C, walk into that door and the big door at the top will unlock. Once you have caught him, you can rest and save. Do so and prepare for a Boss fight.


Remember to collect the Work Gloves (J) then enter the big door at the top. Once you enter, you can not get out. After a few scenes (after each scene, head right for the next). Following these scenes, you will encounter the Boss.

Tips:


Boss absorbs Fire damage.


Equip Fire Materia with Elemental Materia on Armour to protect against Fire damage (Fire Ring's also work).


Poison Materia linked with Added Effect Materia on a weapon will allow you to poison the Boss with standard attacks.

Boss Fight: Red Dragon (Level: 39)

Statistics
HP MP Attack Mag
Attack
Def Mag
Def
Dex
6800 300 95 85 80 260 90
Elemental Affinity
Fire Ice Lightning
-100% 100% 100%
Earth Poison Gravity
100% 100% 0%
Water Wind Holy
100% 100% 100%
Rewards
Items Gil EXP AP
Dragon Armlet (Armour) 1000 3500 200
Other Details
Morph Attacks Steal
None Dragon Fang, Red Dragon Breath & Tail Attack None

After the Boss fight, collect the Bahamut Summon Materia on the floor in front of you and make sure you are equipped and healed ready for another Boss fight. Head right to the altar and you will see a floating item, it says Black Materia. Trying to take it will not work, turns out the whole temple is the Materia and to get it, someone must sacrifice themselves to activate the sequence to shrink the temple into the Materia, but this can only be done from the inside.


Cait Sith will arrive and, as he has an artificial body, he will activate it. Head back to the clock room and the hands will be set to XII, which is the exit, cross over enter the XII Position door. As you approach the door in the next room, a Boss fight will happen.

Tips:


Boss has very high Magic Defence; use pysical attacks but do not have Elemental Materia linked with Earth or Poison Materia.


Deathblow is useful to have here.


Bahamut is a good Summon as it ignores Magic Defence.


LIMIT BREAKs are also a good choice for physical damage.

Boss Fight: Demon's Gate (Level: 45)

Statistics
HP MP Attack Mag
Attack
Def Mag
Def
Dex
10,000 400 150 96 100 450 120
Elemental Affinity
Fire Ice Lightning
100% 100% 100%
Earth Poison Gravity
50% 0% 0%
Water Wind Holy
100% 100% 100%
Rewards
Items Gil EXP AP
Gigas Armlet (Armour) 4000 3800 220
Other Details
Morph Attacks Steal
None Normal: "Advance", Cave-In, Falling Rocks & Petrif-eye
Advanced: Demon Rush & "Retreat"
None

FF7 North Continent Tiny Bronco

After the boss is defeated, Cait Sith will come in and a scene will play where he unlocks the Black Materia. Afterwards, Cloud will jump down and get it but Sephiroth will show up and somehow gets Cloud to give it to him.


Cloud will lose consciousness and another scene will play. When you wake up, you will be in a bed in Gongaga, after a conversation with Barret and Tifa, you must head off to find Aeris and the Sleeping Forest.


Upon leaving Gongaga, the Tiny Bronco is waiting for you, hop in and follow the coastline to the Northern continent and Bone Village.


[Fort Condor Battle- Before heading off to Bone Village, you can do a Fort Condor battle at this point.


FF7 Bone Village

Bone Village:


When you enter, you can talk to the man in front of you and ask questions, but the goal here is to find the Lunar Harp.


Talk to the man in the doorway (A) for a shop and to start excavating; for now, choose to search for the Lunar Harp only, not Good Treasure or Normal Treasure, you can do this more later if you wish.


You can place 5 members of the dig team around the site for 100 Gil each and they will point to where the treasure is. 


The location of the Harp is on the second level, to the left of the Bone Tent (B), the image shows an approximate location so set your workers around this area in a circle and they will point the exact location.


If you have been successful, the box near the entrance will have the Lunar Harp in it the next morning.


Once you have the Lunar Harp, exit into the Sleeping Forest at the top (1).

Shop (A) Price
Diamond Bangle 3200 Gil
Rune Armlet 3700 Gil
Potion 50 Gil
Hi-Potion 300 Gil
Phoenix Down 300 Gil
Ether 1500 Gil
Hyper 100 Gil
Tranquilizer 100 Gil
Tent 500 Gil

FF7 Sleeping Forest

Sleeping Forest:


[Items to find: Kjata Materia, Water Ring]
[Quest Options: Fort Condor Battles]


When you enter the forest with the Lunar Harp, the forest will awaken, run forward and on the next screen look out for a Summon Materia moving around. Catch it and receive Kjata Summon Materia.


When done, head to the exit (1) .


The next location is known as the Corel Valley, as you walk up, take a right and head under the log (2) , there is a Water Ring (B) in a chest. Head back and this time, head up and through the log (3) and then head north.


On this final screen, just follow the path to the City of the Ancients.


[Fort Condor Battle] - Before heading into the City of the Ancients, you can do another Fort Condor Battle.

FF7 Coral Valley

FF7 Forgotten City Part 1

City of the Ancients:


[Items to find: Guard Source, Elixir, Enemy Skill Materia, Magic Source, Aurora Amulet, Comet Materia]

[Quest Options: Fort Condor Battles]


Upon arriving, there are 3 paths, head right first (1)


On the next screen, head into the "House" nearest (A) and head up, up the ladder and open the chest for a Guard Source.


Exit the house and enter the next house (B), run right to a chest with an Elixir, then head up the ladder, there are some beds here if you want to rest, but behind the top bed is an Enemy Skill Materia.


Exit the house and head back to the first room, there is another location to go to, but not now (5).


Head left (2) this time and head into the house (C), head upstairs and there is a chest with a Magic Source. There is also a Save Point and an exit in the back, head out the back door and head right (4).


Inside this room, there are some stairs south of the entrance, head down then right to find a chest with an Aurora Armlet. Now, head back to the first screen and head into the Forgotten City (3).


[Fort Condor Battle] - Before entering the Forgotten City there is a Fort Condor battle to do.

FF7 Forgotten City Coral House

Following the path, you will arrive at a big Coral House, head left and up to enter the house.


Inside, head to the top to collect a Comet Materia (A). Head back down and go down the path in the middle (1) which leads into the Forgotten Capital and head down the stairs.

FF7 Forgotten Capital

Inside the Capital, you need to find Aeris, who is in the middle, praying.


Use the Save Point if you want and prepare for a Boss fight.


Head down the stairs and across the steps to reach Aeris, where a scene will play.


Following the scene you encounter a Boss Fight.

Tips:


Boss is weak to Earth damage but has high magic defence. Attach Earth Materia and Elemental Materia in a linked slot on a weapon to deal extra damage with physical attacks.


Boss absorbs Water damage.


Boss uses Aqualung which is an Enemy Skill, so have Enemy Skill Materia attached.


All attacks are water based, using a water ring will make this easy (Elemental Materia and Leviathan Materia in a linked slot on armour will also work)

Boss Fight: Jenova-LIFE (Level: 50)

Statistics
HP MP Attack Mag
Attack
Def Mag
Def
Dex
10,000 300 128 40 110 290 140
Elemental Affinity
Fire Ice Lightning
100% 100% 100%
Earth Poison Gravity
200% 100% 0%
Water Wind Holy
-100% 100% 100%
Rewards
Items Gil EXP AP
Wizard Bracelet (Armour) 1500 4000 350
Other Details
Morph Attacks Steal
None Aqualung*, Blue Flame, Blue Light & Reflect None

End of Disc 1


Disc 2

FF7 Corel Valley Cave Part 1

Corel Valley Caves:


[Items to find: Viper Halberd, Bolt Armlet, Hypnocrown, Megalixir, Magic Plus Materia, Power Source]

[Quest Options: Fort Condor Battles]


When the scene has finished, you will be outside one of the houses in Corel Valley.


[Fort Condor Battle] - Before going further, if you are doing the Fort Condor battles, head back out the way you entered and leave Bone Village to go to Fort Condor.


If you need to rest, head to the other house to rest if you need to but head north then east to the location we could not go to before.


You will see another, large Coral Shell-like building, head to the left and around the back to reach the chest (A) which contains a Viper Halberd.


Head back, then climb up the shell (2), climb to the top, then, on the outside, climb down and off to the left (3).

FF7 Coral Valley Cave Wall Climb

Inside the caves, you need to climb and descend the cracks in the walls to get the items and get to the ladder:

  • First, climb up (1) and when prompted, choose Left.
  • Head to and climb (2) and choose Right.
  • Climb (2) and choose up to get Bolt Armlet (B).
  • Climb down and choose Right.
  • Head to (3) and choose down, his will get you the Hypnocrown (A).
  • Head back up the crack (3) and choose right, climb it again and choose Up to get the chest (C) which contains a Megalixir.
  • Climb onto (3) again, but try to go up, choose left to get off.
  • Head to and climb (4) and proceed to the ladder.
  • Climb down the ladder to get Magic Plus Materia (D).
  • Climb the ladder to the middle, then climb it up to the top and exit via (5).

In the next room, there is a chest to the right with a Power Source, then head north to exit the Caves.


You are now back on the world map, head west to the Icicle Inn.


FF7 Icicle Inn

Icicle Inn:


[Items to find: Hero Drink, Vaccine, X-Potion, Turbo Ether]


This is the north-most town in the world, there is a Weapon Shop (A), an Inn (C) and various houses.


If you go in the house (B) there are 2 items in here, a Hero Drink and a Vaccine.


In the Inn, there is a room under the stairs leading to a bar, you can talk to the locals and hear about a Cetra (Ancient) who lived here called Ifalna, Aeris' Mother. You can rest here for 200 Gil and if you head upstairs there is an X-Potion in the corner, by the window.

Weapon Shop (A) Price
Organics 12,000 Gil
Dragon Claw 10,000 Gil
Microlaser 12,000 Gil
Adaman Clip 11,000 Gil
Hawkeye 12,000 Gil
Red M-Phone 11,000 Gil
Mast Ax 13,000 Gil
Lariat 12,000 Gil
Hi-Potion 300 Gil
Tent 500 Gil

You can enter Ifalna's House and watch the video recordings between Ifalna and Dr. Gast about the Cetra, The "Weapons" and the Planet. There are also "Confidential" records. Head into the basement to find a Turbo Ether behind the bed.


Head back outside and try to leave via the north road (1), you will be stopped by a local.


If you say Thank you, he will ask if you want to learn how to snowboard, say yes and a series of controls will appear on the screen.


If you say you are going anyway, Elena of the Turks will arrive and blame you for what happened to Tseng. She will go to punch you, press left or right to dodge and she will roll down the hill... seriously.


Head back to the entrance and talk to the Shinra soldiers who will tell you something big is happening at the Northern Cave. Head into the remaining house (E) and talk to the boy, he will give you his snowboard (The cat will move and you can collect it from the bed). 


The last thing you need is a map, head into (B) and take the map that is on the wall to the left.


Now, exit via (1).


FF7 Great Glacier Map

The Great Glacier:


As you snowboard down the hill, there are 4 paths you can take; two times you will have to choose left or right. Depending on which route you choose, depends on your laning place.

  • Go Left, then Left (1)
  • Go Left, then Right (2)
  • Go Right, then Left (3)
  • Go Right, the Right (4)

It is not possible to give directions here as it depends on where you land, run around for a bit and eventually you will pass out and arrive at Holzoff's house at the base of Gaea Cliffs. 


You can keep going back to the Great Glacier to collect everything, but you must run through a large, white plain which will rotate as you run but you can put markers down to help you. Heading due south, brings you to a small cave, inside is an All Materia.


Items you can collect:

  • Mind Source (A), in the north-east of the forest.
  • Elixir (B), Inside the cave at the crossroads.
  • Potion (C), on the shore leading to the iceberg puzzle.
  • Alexander Summon Materia (D), touch the Hot spring then, from the base of Gaea Cliffs, head east on the white plain. Keep going until you reach a cave, enter and talk to the woman. She will fight you, when you win you get the Materia. (See below)
  • Safety Bit (E), you must cross some icebergs, as you jump on one, the others around it will change. To get to the island, go: Up, Left, Down, Left, Up, Right, Up, Up, Up, Left, Down, Right, Right, Up. To get back go: Left, Down, Right, Right, Down, Left, Down, Right, Down, Left.
  • Added Cut Materia (F), from the hot springs, head north to the Multi-path road at the top of the hill in the North East. Head straight up to the north most exit and on the next screen you will find the Materia on the floor.

When you are done, from Holzoff's house, head up the mountain.

Tips:


Fire2, Beta (Enemy Skill) and L4 Suicide (Enemy Skill) are very effective against Boss.


Fascination causes Confusion status effect.


Elemental Materia with Ice Materia on Armour will be useful against her Ice attacks.

[Optional] Boss Fight: Snow (Level: 32)

Statistics
HP MP Attack Mag
Attack
Def Mag
Def
Dex
4000 160 50 80 66 138 70
Elemental Affinity
Fire Ice Lightning
200% -100% 100%
Earth Poison Gravity
100% 100% 100%
Water Wind Holy
100% 100% 100%
Rewards
Items Gil EXP AP
Ice Crystal (Consumable Item) (14%)
Alexander (Materia)*
700 500 42
Other Details
Morph Attacks Steal
None Cold Breath, Fascination & Ice2 Circlet (Accessory)

FF7 Great Glacier Added Cut Location
FF7 Great Glacier Mind Source Location
FF7 Great Glacier Alexander Location
FF7 Great Glacier All Materia Location

FF7 Gaea Cliffs Caves Part 1

Gaea Cliffs:


[Items to find: Ribbon, Javelin, Elixir, Fire Armlet, Megalixir, Speed Source, Enhance Sword]


To climb the mountain, you need to maintain your body temperature, when you reach a ledge, press (Switch) repeatedly to raise your temperature before doing the next bit.


When you reach the first cave, head into the cave (1) and then head left and exit at (2) back into the previous room. Head down, then right across the bridge, keep going forward into the side room where there is a box with a Ribbon (A).


Head out of the hidden room and then up, follow the path and take a right to the item box (B) which contains a Javelin.


Head into the room (3) and head north-west along the bridge to (4) which leads to a cave at the top (4). There is a rock up here, kick it over then head back down and head back to (2) going back through the other room to do so.


Knocking the rock down removed a blockage, head up to (5) which goes around the back to another cave, follow the path to (6) then, finally, exit this cave via (7).

FF7 Gaea's Cliff Caves Part 2

On the next cliff face, climb as you did before, but you will be asked which direction a couple of times, just head straight up.


Enter the cave at the top.


In the cave, head straight to the right to get a chest (C) with an Elixir then head into the door (1). Follow the path to (2).


In the next room, there are 2 chests on the ledge containing Fire Armlet (B) and an Megalixir (C). As you walk along the ledge, you will have 4 battles, one of the "Enemies" is a large Icicle. After beating each icicle, one will drop down from the ceiling and you can jump down. Drop down only after beating all 4 and getting the chest (You may need to exit and re-enter the room to get the prompt).


Once you are back down, head to the left and collect the chest (D) containing a Speed Source. You can now jump across the ice to the central door (3) which leads to the other side of the mountain path with a chest (E) containing a Enhance Sword. Follow the path around to (4) and exit via (5).


You will be on another cliff face, climb straight up again, no need to go any other direction and you will enter another cave.


There is a Boss fight coming up, so save and interact with the glowing pool to heal, then exit to the right.


Tip: Equip Ice Ring, Dragon Armlet and Fire Ring. The character with the Ice ring, add Fire-Elemental Materia's to armour and the Fire ring, use Ice-Elemental Materia's on armour.


As you enter the tunnel, a man in black will appear and then disappear, run towards him and the Boss will appear.

Tips:


The Boss has 2 heads; one absorbs fire and the other absorbs Ice. Do not use Fire or Ice Summons as you will heal one while dealing damage to the other.


If using summons; non-elemental ones (Bahamut, Alexander, etc) are a safe bet as are Ramuh, Leviathan & Titan.


Boss has a final attack when each head is defeated that deals 1000HP+ to all party members. You can protect against this with Lightning Materia and Elemental Materia on a linked Armour slot.


Fire Rings & Ice Rings will help with attack damage.

Boss Fight: Schizo (Level: 43)

Statistics
HP MP Attack Mag
Attack
Def Mag
Def
Dex
18,000 350 57 40 52 94 72
Elemental Affinity
Fire Ice Lightning
-100% (Right) -100% (Left) 100%
Earth Poison Gravity
100% 100% 0%
Water Wind Holy
100% 100% 100%
Rewards
Items Gil EXP AP
Dragon Fang (Consumable Item) 3000 4400 240
Other Details
Morph Attacks Steal
None Double Breath Attack, Left Breath Attack, Right Breath Attack & Tremor Attack Protect Ring (Accessory) (Right Head)

FF7 Northern Crater Cut scene

Once you have defeated the boss, head towards the screen to exit the cave and go to the right of the door and climb up into the crater.


A scene will play, followed by a decent into the crater.


FF7 Whirl

Whirlwind Maze:


[Items to find: Neo Bahamut Materia, Hi-Potion, Ether, Kaiser Knuckles, MP Turbo Materia, Poison Ring]


As you descend the crater, examine any of the men in black you find as they may turn into an item.


As you run along, there is a Neo Bahamut Summon Materia (A) in the foreground. Continue along the path to the left, jump to the save point (B), then continue up then left again.


After a scene, continue left to exit this area (1).

FF7 Whirlwind Maze Part 2

On the next screen are two men in black, approach them and one of your party will tell you you need to cross when the wind is gone or you will fall off.

Examine both men to receive a
Hi-Potion (B) and an Ether (C) .

Continue across the path, avoiding the wind in the middle and proceed to the next area
(2) .


This section the path winds left and right, collect the Kaiser Knuckles (D) from the chest and head up to the exit (3) .

FF7 Whirlwind Maze Part 3
FF7 Whirlwind Maze Part 4

The next screen has another wind trap, but this time there is a green wave that goes across it. Time your run between the green wave to get through. Prepare for a Boss fight.


As you start through this section, you will find Sephiroth killing two men in black, then he will disappear and attack you.


Following this scene is a Boss fight.


Tip: Equip party with Fire Ring or Fire-Elemental Materia combination on armour. The Ribbon accessory is also useful.

Tips:


Boss uses Fire-based magic attacks; Fire Rings and Fire Materia linked with Elemental Materia on Armour will help.


Boss can cause Silence; the Ribbon accessory will prevent this. You can also use Added Effect and Seal on Linked armour slot.


Boss is vulnerable to Paralyze; Dazers are a useful item to have for this.

Boss Fight: Jenova-DEATH (Level: 55)

Statistics
HP MP Attack Mag
Attack
Def Mag
Def
Dex
25,000 800 140 70 90 320 150
Elemental Affinity
Fire Ice Lightning
100% 100% 100%
Earth Poison Gravity
100% 100% 0%
Water Wind Holy
100% 100% 100%
Rewards
Items Gil EXP AP
Reflect Ring (Accessory) 5000 6000 400
Other Details
Morph Attacks Steal
None Red Light, Silence & Tropic Wind None

FF7 Whirlwind Maze Part 5

After the battle, you regain the Black Materia, give it to one of your party members (Most won't take it, so the "choice" is limited) then talk to Tifa and continue on.


There is a MP Turbo Materia (E) in front of you and at the exit you will find a Save Point and a Poison Ring in a chest (F). Save, use a tent if you need one and exit.


You now face another trap, this time with the added hazard of lightning, time it so you dodge all 3 hazards (Wind, Energy wave & Lightning) to proceed.


You are now in an illusion back in Nibelheim at the time of the incident. Talk to Tifa to continue the scene then Sephiroth will appear, talk to Sephiroth to continue then talk to Tifa.


After Nibelheim, we see Rufus and the Shinra Executives arrive at the center of the Crater then it cuts back to the rest of the party for a scene.


During the scene, when you are in control of Cloud, examine the green glow behind you and another scene plays.


FF7 Junon Execution Escape Part 1

Junon:


After the scene where the Weapons awaken, Tifa, who was knocked unconscious, wakes up 7 days after the events with Barret who explains what has happened. When you gain control, talk to Barret and Rufus and Heideger will arrive.


You are to be executed by Shinra. As Barret, follow the guard, save in the next room (Take this time to equip Barret and Cait Sith with some Materia, weapons and armour as you will be fighting soon.)


After following the guard and Tifa into the press conference room, Tifa will be taken away and then Weapon will attack. Cait Sith reveals himself and a battle starts. After the battle, head to the door of the chamber and try to open it.


After another scene where Shinra are fighting Weapon, talk to Cait Sith then exit the room. Head right to go outside and run towards the screen. You will meet up with Yuffie, who is disguised as a reporter, who joins you. Make sure to equip her as well.


Continue to the Airport, use the elevator to go up (Same elevator as when Cloud was here earlier, use the yellow switch on the floor to go up). Head right, towards the Airship.

FF7 Junon Execution Escape Part 2

After the scene, you will be back with Tifa, use the buttons to move various parts of your body to get free:

  • Head (MENU)
  • Legs (CANCEL)
  • Left Arm (OK)
  • Right Arm (SWITCH)

Here is how to get free:

  1. Use your legs twice to bring the key towards you
  2. Use your head to bring yourself back to a sitting position.
  3. Use Head and Legs together to bring key up and into your mouth
  4. Use your head and an arm to bring the key down and unlock an arm
  5. Use the same arm again to get the key and unlock the other arm.

Once you are free, go into the corner (A), next to the chair, and press (OK) on the switch to turn the gas off. Then, try to open the door.


After another scene, Tifa will climb out of the room and you need to then climb down the wall at the side, run to the front of the building and climb down here.


Finally, run along the Big Gun to the very end where Scarlett will arrive and you get to slap her silly. Finally, run to the end of the cannon to be picked up by Barret and the Airship.


FF7 Highwind Internal View

Mideel:


[Items to find: Enemy Skill Materia, Elixir, Contain Materia, Curse Ring]

[Quest Options: Fort Condor Battles]


You are now aboard the Highwind, Cid's Airship, Tifa is now the party leader. After the scene where you are saved from Shinra, head downstairs (Talk to Yuffie on the deck if you wish) and head to the Bridge (1).


Talk to your party for some dialogue (Talk to Red XIII then talk to Cid) finally, talk to the pilot. Cid will say he has to teach him how to land and to go to Operations Room to prepare.


Exit the bridge and head to Operations (2), inside there is a member of the crew to the left, talk to him to reform your party. Talk to him again to access PHS, Save & Rest. Once done, head back to the bridge, talk to the man by the door to Operations (A) if you want to know how to fly the Highwind, but talk to the pilot to start flying.

FF7 Mideel Location

Head to the Icicle Inn, on your way there, you can stop off at a small location called the Chocobo Sage. If you are planning to breed Chocobo's, he will be useful, but for now, talk to the Chocobo to get an Enemy Skill Materia from it.


Back on the airship, continue to Icicle Inn, you can't land on the snow, so find a patch of grass to land and head there on foot.


Inside the town, stock up at the weapon shop and talk to the residents. They will mention how cold it has gotten and some will mention an "Island in the South" called Mideel.


This is your next lead, head south-East to a small island south of the first continent.


[Fort Condor Battle] - This battle must be done before entering Mideel. Due to the previous events, you have missed 5 battles but they have th funds to fight them. There is another battle that you will miss, so if you are doing these battles, donate 3000 Gil to them for the next missed battle.

FF7 Mideel Town

Upon entering the village, head to the middle and a short scene will play with Tifa overhearing a conversation about a man who washed up at the island. 


Afterwards, Tifa will leave the party to look after Cloud on the island, and Cid assumes the role of party leader.


Head to the Operations room and assemble a party for the trip to Corel. Before heading to Corel, head back to Mideel to stock up.


There are a few stores here, an Item Shop (A), a Weapon Shop (B), an Accessory Shop (C) and a Materia Shop (D). There are also a couple of free items and you can rest for free at the Clinic where Cloud and Tifa are.

There are also a few free items:

  • There is an Elixir on the bed of the house (E)


  • You may have noticed a woman running around with a baby Chocobo, if you have a Mimett Greens with you, talk to the Chocobo, feed it the greens and tickle it behind the ear to get a Contain Materia.


  • If you go to the weapon shop and examine the door at the back, you will see that it is locked. Head towards the accessory shop and walk around outside until you hear a noise. Examine the side of the shop to get a "Beaten-up useless old key". Use the key on the door in the weapon shop and then "Tell them the truth" and you will get a Curse Ring.


Now, once done, leave and head to North Corel Reactor, north west of Mideel. Head to the entrance in the mountains, west of Costa del Sol. Follow the path up the hill to reach the reactor.


Item Shop (A) Price
Hi-Potion 300 Gil
Phoenix Down 300 Gil
Ether 1500 Gil
Hyper 100 Gil
Tranquilizer 100 Gil
Remedy 1000 Gil
Tent 500 Gil
Weapon Shop (B) Price
Crystal Sword 18,000 Gil
Crystal Glove 16,000 Gil
A-M Cannon 18,000 Gil
Crystal Comb 17,000 Gil
Crystal Cross 18,000 Gil
Crystal M-Phone 18,000 Gil
Partisan 19,000 Gil
Winchester 18,000 Gil
Crystal Bangle 4800 Gil
Wizard Bracelet 12000 Gil
Accessory Shop (C) Price
Amulet 10,000 Gil
Fire Ring 8000 Gil
Ice Ring 8000 Gil
Bolt Ring 8000 Gil
Fairy Ring 7000 Gil
Jem Ring 7500 Gil
White Cape 5000 Gil
Materia Shop (D) Price
HP Plus 8000 Gil
MP Plus 8000 Gil
Transform 5000 Gil
Gravity 8000 Gil
Destruct 9000 Gil

FF7 Corel Catastrophe

North Corel:


Upon arriving at the reactor, you will see some Shinra soldiers by the entrance, head down the staris and try to enter the reactor. The guards will stop you and fight you. Once you have beaten the soldiers, a train will come at you, and you will follow on your own train.


You have 10 minutes to catch up to the Shinra train and stop it. To catch up, alternate the left and right levers by pressing (UP) and (MENU) as fast as you can. You must now jump across to the train and head to the front. Each carriage has a fight:

  1. Gas Ducter: Hit hard and fast, easy to beat but don't use Bio.
  2. Gas Ducter (x2): Same as before but two to fight this time.
  3. Wolfmeister: Leviathan Summon and Aqualung Enemy skill will make short work of this one.
  4. Eagle Gun: Bolt3 and Trine Enemy skill are the way to go here.
  5. The engine crew: easy but there is a conversation beforehand and after so hurry through the talking.

You must now stop the train, if you don't, it will crash into Corel. Using (UP) + (Menu) & (DOWN) + (Cancel), use both levers at the same time to slow down. Move both down, then up and keep doing this to stop the train.


If you stop the train, you will receive the Huge Materia and upon entering the town, you will receive Ultima Materia. After resting, head to the house south-west of the inn and talk to the person at the back, you will get Catastrophe. Now, leave town and head back to the Highwind.


If you fail, you can still buy Ultima Materia, but it is 50,000 Gil.


FF7 Fort Condor Battle

Fort Condor:


[Items to find: Phoenix Materia]


Return to Fort Condor and head up to the top. This is the last (and only mandetory) Fort Condor Battle. You will be helping the residents fight off the Shinra Troops, but you will need Gil. Talk to the old man at the table in the main room then climb to the top (left) and talk to the man standing on the box to initiate the mini-game or you can ask for more details.


You have to place units on the side of the mountain to battle the enemies that are coming up.


Tip: Place a fast moving unit (Attacker is the fastest) as close to the battle line as possible then start the battle. Have the unit move down the mountain towards the enemy to mve the battle line down as fr as you can. Add more fighters as you need and keep the enemy as close to the bottom as you can. You can win before all the enemies spawn if you defeat all the enemies on screen.


The units cost:

  • Fighter = 400 Gil
  • Attacker = 420 Gil
  • Shooter = 520 Gil
  • Defender = 440 Gil
  • Repairer = 480 Gil
  • Worker = 400 Gil
  • Stoner = 480 Gil
  • Tristoner = 1000 Gil
  • Catapult = 480 Gil
  • Fire Catapult = 600 Gil

If an enemy reaches the top, you will have to fight the enemy commander. After the battle is won, the egg hatches. Head outside to the top and you will find a Phoenix Summon Materia. Head back in, head down to the main room and talk to the old man at the table to receive the Huge Materia.


Stock up and rest if you need to, then leave and head back to Mideel.

Tips:


Boss is fought if you lose the storyline strategy battle above.


Boss can use Punch once or twice immediately after using Poison Breath.


Boss will use Grand Attack when defeated.

[Optional] Boss Fight: CMD. Grand Horn (Level: 37)

Statistics
HP MP Attack Mag
Attack
Def Mag
Def
Dex
8000 300 100 95 70 80 79
Elemental Affinity
Fire Ice Lightning
100% 100% 100%
Earth Poison Gravity
100% 100% 100%
Water Wind Holy
100% 100% 100%
Rewards
Items Gil EXP AP
Imperial Guard (Armour)
Phoenix (Materia)*
9600 800 80
Other Details
Morph Attacks Steal
None Grand Attack, Poison Breath & Punch None

(*) Phoenix Materia is under the egg when it hatches.


Mideel:


Enter the town and prepare for a Boss Fight.


When you are ready, enter the Clinic and talk to Tifa. Afterwards, the ground will shake and Ultimate Weapon will arrive to destroy the town.


Head outside and, after a short conversation, you will fight Weapon.

Tips:


This is a story event and the Boss is not meant to be beaten at this stage.


Boss uses attacks in a fixed pattern: Quake2, Claw, Ultima Bean and then it will Flee.


Be quick to steal the Curse Ring and watch your HP; use Regen and MBarrier to reduce damage from Quake2 and Ultima Beam.

Boss Fight: Ultimate Weapon (Level: 61)

Statistics
HP MP Attack Mag
Attack
Def Mag
Def
Dex
100,000 400 100 170 120 100 120
Elemental Affinity
Fire Ice Lightning
100% 100% 100%
Earth Poison Gravity
100% 100% 0%
Water Wind Holy
100% 100% 100%
Rewards
Items Gil EXP AP
None 0 0 0
Other Details
Morph Attacks Steal
None Claw, Quake2 & Ultima Beam Curse Ring

FF7 Lifestream Memories

After the battle, the town starts to shake worse than before. After a scene where Tifa and Cloud try to escape, they fall into the Lifestream.


Following this, Tifa is alone, surrounded by darkness. When she wakes up, she is seemingly in Cloud's mind and there are several of him around.


Talk to each in turn, starting with the one at the top (A). Talk to Cloud, then walk towards the scene behind you. This is the mission in Nibelheim from 5 years ago. Talk to Cloud again to initiate the scene.


Afterwards, head to the Cloud on the left (B) and talk to him. This is the memory of Tifa and Cloud, as kids, talking at the well in the middle of Nibelheim. After the scene, Tifa meets a young Cloud who mentions an important memory.


Now, talk to the Cloud in the bottom-right (C). When he moves, talk to the young Cloud by the window (D). This is a memory that Tifa doesn't remember clearly, Cloud follows Tifa through Mt. Nibel and they fall; Tifa ends up in a coma for several days.


Finally, go back to the top Cloud (A) and talk to him again and then walk towards the Nibelheim scene. Cloud will run off to the reactor. Here we see what really happened.


After the scene, all the fragments of Cloud will join as one in the middle. Tifa and Cloud will then leave the Lifestream together; washing up on the shore, surrounded by the rest of the party.

You are now aboard the Highwind, after the conversation, go to leave the room and create your party. 


Now, head to the bridge where you will be told of the last Huge Materia in Junon, which is where you'll head next but you can still go to Mideel if there are any items or Materia you need to buy.


The Item Shop (A), the Materia Shop (B) and the Accessory Shop (C) but due to the attack, their inventory is severely reduced and a lot of items will not longer be available from here.


If not, fly to Junon.

Item Shop (A) Price
Potion 50 Gil
Phoenix Down 300 Gil
Antidote 80 Gil
Tent 500 Gil
Materia Shop (B) Price
Fire 600 Gil
Ice 600 Gil
Lightning 600 Gil
Restore 750 Gil
Accessory Shop (C) Price
Amulet 10,000 Gil
Fire Ring 8000 Gil
Ice Ring 8000 Gil
Bolt Ring 8000 Gil
Fairy Ring 7000 Gil
Jem Ring 7500 Gil
White Cape 5000 Gil

FF7 Junon Underwater Reactor

Junon:


When you arrive at Junon Village, head to the far left where there is an Elevator, get in (10 Gil to use) and head up to Junon.


Once at the top, head left and head down the street, after the brief scene, keep following the street south-west until you exit the screen. Follow the road west into the underground road. Take a left and you will see some soldiers, follow them down and enter the door in the north wall.


On the elevator, defeat the two soldiers and when the elevator comes to a stop, exit for another battle. Follow the path through several rooms until you reach another elevator. Head down the elevator and follow the underwater path into the building at the end. Use the switch on the opposite wall to enter the reactor.

FF7 Underwater Reactor

Underwater Reactor:


Inside the reactor, head west past the submarines and continue following the path. Inside the control room, you will face a few battles while going through, keep going until you reach the reactor. Walk up to it to get a brief conversation then head right to the submarine dock, but prepare for a Boss Fight.


Tip: Boss is weak to lightning and is 3 separate parts, so Lightning-All Materia will be useful.


Approach Reno to get a conversation and a Boss Fight.

Tips:


The arms can grab party members and imobilize them while dealing damage.


The arms have 10,000HP each and, when defeated, the party members will be released.


Boss is weak to lightning, so use Ramuh, Bolt3 & Trine (Enemy Skill).


MBarrier can reduce damage from Lapis Laser.


Game Over can occur if 2 characters are immobilized and the third is KO'd.

Boss Fight: Carry Armor (Level: 45)

Statistics
HP MP Attack Mag
Attack
Def Mag
Def
Dex
44,000 400 90 55 200 300 80
Elemental Affinity
Fire Ice Lightning
100% 100% 200%
Earth Poison Gravity
100% 0% 0%
Water Wind Holy
100% 100% 100%
Rewards
Items Gil EXP AP
God's Hand (Weapon) 4000 5700 425
Other Details
Morph Attacks Steal
None Body: Damage Attack (Only when arms are present) & Lapis Laser
Arms: Arm Grab, Arm Punch & Damage Attack
None

FF7 Underwater Reactor Submarine Dock

Submarine:


[Items to find: Battle Trumpet, Scimitar, Leviathan Scales]


After the battle, the red Submarine will have left. To the left of the Red Sub dock is a chest with a Battle Trumpet (A), head towards the other submarine (1) and collect the chests for a Scimitar (B) and Leviathan Scales (C).


Now, board the other submarine, fighting the soldiers here to gain access, inside there is another fight and a Save Point. Head into the bridge where the guys from the parade are stationed. You can either fight them or take the hostage, either way, you are now in control of the sub. Examine the pilot seat for a tutorial or to launch the sub.


The mission is quite easy, speed up a bit to maintain distance behind the red sub and use (Switch) to fire at it. Keep the red sub in sight and the cursor will turn to red to show you are locked on. Keep firing and shortly it will be destroyed, dropping the Huge Materia.


For now, you will head back to Junon but you now have the submarine to use when you want to. Use it later to get the Huge Materia and a few other things later. Enter Junon Village again and head up the elevator. This time, exit via the top-right door to the airport and, as you approach the runway, a plane will take off with the final Huge Materia.


After, head back down the elevator and exit Junon. Board the Highwind and head to Rocket Town.


Rocket Town:

Before entering Rocket Town, Cid will need to be in your party, if he is not, he will be added so make sure you equip him with better weapons and Materia as there is a Boss fight soon after arriving.

After arriving, head to the rocket and fight your way up. At the top, you will encounter Rude of the Turks. This is the Boss fought.

Tips:


Attack Squad have 1300HP each, so no major issue to dispatch them. Rude is on the back row and can not be targeted with regular attacks until Attack Squad are defeated.


Rude can use Grand Spark 3 times in a row but will not use it against Tifa.


Rude will only target Tifa when both other party members are KO'd; the only attack he will use is Shoulder attack and has a 1/3 chance he will not attack her.


Protect against his lightning attacks with a Bolt Ring or Lightning and Elemental Materias linked on armour.

Boss Fight: Rude (Level: 42) with Attack Squad

Statistics
HP MP Attack Mag
Attack
Def Mag
Def
Dex
9000 240 60 30 60 160 78
Elemental Affinity
Fire Ice Lightning
100% 100% 100%
Earth Poison Gravity
100% 100% 0%
Water Wind Holy
100% 100% 100%
Rewards
Items Gil EXP AP
Hi-Potion (Consumable Item) (14%)
S-Mine (Consumable Item) (14%)
3840 3400 80
Other Details
Morph Attacks Steal
None Rude: Bolt2, Cure2, Grand Spark, MBarrier & Shoulder Attack
Attack Squad: Grenade, Machine Gun & Smoke Bullet
Rude: Ziedrich
Attack Squad: 8-Inch Cannon

Once past Rude, there is one more fight on the rocket before you can continue. Enter the rocket, fight the enemy then go through the door in the north wall to get to the bridge.


After a conversation, Palmer will launch the rocket which is set on a course for Meteor. Cid will tell you where the Huge Materia is, so head to the right where there is a ladder, climb it to the room above. Examine the Huge Materia and Cid will explain it has been locked with a passcode.


You can guess at the passcode to get the Materia, as you try combinations of the 4 buttons, Cid will give you clues as you try. After the first failed attempt, you have 3 minutes to get the right answer or you lose the Huge Materia.

SPOILER: This is the passcode for the Huge Materia, hover your mouse over the black box to the right - (Switch), (OK), (Cancel), (Cancel)
FF7 Space (Escape Pod)

Once you have the Huge Materia, head back to the bridge, then exit via the door to the south, keep heading south and down the ladder in the corridor.


This leads to the escape pods, examine the tank that is sparking and it will explode, Cid will be trapped under the debris and realise that Shera was right about the oxygen tank being faulty.


Shera will arrive and help free Cid, afterwards, follow her to the Escape Pods.


Following this is a cut scene and a conversation on the Highwind; our next destination is Cosmo Canyon.

Side Objectives:


[Items to find: Oritsuru, Steal As Well Materia, Key to Sector 5, Premium Heart]


Wutai: If you collected the Leviathan Scales earlier, you can head to Wutai's Da-Chao to the cave with the fire from earlier. Walk up to the fire and it will go out, revealing the items. The first one is a Oritsuru, the second is a Steal as Well Materia. Once done, head back to the Highwind.


Midgar: Head to Midgar and talk to the man by the door, he will say he lost the key to the door on an excavation. Head to Bone Village and dig around the nose of the downed plane (Dig here) to get the Key to Sector 5. You can now head to Wall Market and get Premium Heart from the 1st Item store (The one with the mini-gun)


Lucrecia's Cave: Using the submarine, head north and around the top of the second continent, while underwater look for a small cave, enter it and follow it around until you see some light. Surface and park by the rocky shore and head inside with Vincent in your party. After a cut scene showing Vincent's past, leave but remember where it is for later.


Crashed Gelnika: Using the sub, head directly west of the underwater reactor to a hidden alcove with a crashed plane. Sometimes Emerald Weapon will be here, if it is, just surface and submerge again and it should have moved. See the guide for this in the Side Quests.


FF7 Cosmo Canyon General Store

Cosmo Canyon:


[Items to find: Full Cure Materia, Elixir, Magic Source, Bahamut Zero Materia]


Head to Cosmo Canyon and before going to visit Bugenhagen, head to the General Store in the north-east. There is a passageway here that was blocked off before, you will see a red rope on the floor where it used to be, head through the door here (1) and head round the back of the shop into the room adjacent where you will find a Full Cure Materia and an item bag with an Elixir and a Magic Source.


Now, head up to the top of the town to Bugenhagen's house and talk to him in his lab. After a brief conversation, Bugenhagen will take you up to the observatory, where you will be storing the Huge Materia you have collected. Examine the Blue Materia to get Bahamut ZERO summon. To leave, examine a Materi and choose Go back down.


Now, head back to the Ancient City.


FF7 Forgotten City Key Room

Ancient City:


Head to Bone village and enter the forest via the exit at the back of the village. Head north through the forest and follow the path into the Ancient City.


At the fork in the road, head west. Follow the path up, past the house and then right, into the large room. Head right along the top of the room and into the hole in the wall (1) and you will emerge at the top (1), head down the stairs and across the bridge to the centre of the room.


After a brief conversation, leave the Ancient City and head to your Submarine.


Head south and look for the enemy submarine (stands out as it is red) and going up to it will initiate a short scene where you receive the final Huge Materia.


Now, head north towards where the cave leading to Lucrecia's Cave, but to the west of that is another cave with a large, white object in it. Interacting with the object will get you the Key of the Ancients. Take this back to Bugenhagen in the Ancient City.

FF7 Key of the Ancients

Give the key to Bugenhagen and he will use it on the device to activate it. After the scene, walk into the middle again for another scene where we find out what Aeris was doing here.


After the scene, make for the exit, but before you can leave you will receive a call from Cait Sith; Shinra have attached the cannon from Junon to the Mako reactors at Midgar and are planning to fire it.


Your next goal is Midgar. Head to the Highwind, but prepare for a Boss Fight. Land the Highwind and wait by the coastline for Diamond WEAPON to arrive.


Tip: Boss is immune to physical attacks until after a certain number of Summons or Limit Breaks have been done. This is also the only way to get Rising Sun for Yuffie via Steal command. If you haven't done so already, make sure Ultima is equipped and levelled up to be able to use it (Requires a level up to use).

Tips:


Boss is weak to Lightning; Bolt3, Ramuh & Trine are useful here.


Boss is immune to physical attacks until its armour opens up; it will open its armour when hit with a certain number of Summons or any LIMIT BREAK; if Boss has over 15,000HP then 2 Summons, if less than 15,000HP, 3 are required.


Once armour is open, it will use Countdown for 3 turns then use Diamond Flash which hits all party members for 7/8ths of their current HP.

Boss Fight: Diamond Weapon (Level: 49)

Statistics
HP MP Attack Mag
Attack
Def Mag
Def
Dex
30,000 3000 50 50 250 250 180
Elemental Affinity
Fire Ice Lightning
50% 100% 200%
Earth Poison Gravity
100% 100% 0%
Water Wind Holy
100% 100% 100%
Rewards
Items Gil EXP AP
None 25,000 35,000 3500
Other Details
Morph Attacks Steal
None Diamond Fire, Diamond Flash & Foot Stomp Rising Sun (Weapon) (51%)

FF7 Diamond Weapon Aftermath, Highwind

Midgar:


[Items to find: Elixir (2), Megalixir, Aegis Armlet, Starlight Phone, Max Ray, Power Source, Guard Source, Mind Source, Magic Source, W-Item Materia, HP Shout, Glow Lance, Behemoth Horn, Pile Bunker, Master Fist]


After the battle, a scene will play showing Diamond Weapon retreating and the Sister Ray being fired. Diamond weapon will fire upon Midgar and the Sister Ray will kill Diamond Weapon and break the barrier around the Northern Crater. Midgar will be devastated by Weapon's attack.


Head to the Northern Crater. As you fly over it, a scene will play showing the remaining Shinra Executives; Heideggar, Scarlett & Reeve.


After the scene, head back to Midgar, fly over it (don't land) and you will parachute out into Midgar. You can change party members before going if you want to. Fun tip: pressing directions will make Cloud do tricks.


Once you land, follow Cait Sith into the alleyway where the rest are waiting. There is a Save Point if you need it. You can talk to your party, but talk to Cait Sith to proceed down into the underground.

FF7 Sector 8 Underground

As you enter the underground system of Sector 8, climb down the ladder to the platform. Head north-east to the fence, head through and down the ramp (1) and follow the path up to the pipes, head left and collect the chest (A)  which contains an Elixir. Head back to the right and past the ramp to the chest (B)  which has a Megalixir.


 Go down the stairs (2)  and down the ladder. At the bottom, head left and north to (3)  and climb the ladder, open the chest (C)  at the top to get Aegis Armlet. Climb back down and head down then right to (4), the platform will drop you down.


Head left and climb up the red pipes (5)  and at the top, head right to the pipe (6). At the bottom, there are two items here; a Starlight Phone (D)  and an Elixir (E).


Head down the ladder near the chest (E)  and jump across to the pipe, run in it and climb up. At the top, run around to the ladder and climb up. Head left to a chest (F) to get Max Ray. Head back down the ladder and down the pipe. Head up the ladder and up the stairs to the exit (8). There is a save point here if you need it, then exit through the door.

FF7 Sector 8 Tunnels

You emerge from the passageway in a train tunnel. Head south, you can find members of your party and some items this way:

  • Section 3: Power Source
  • Section 2: Guard Source
  • Section 1: Mind Source & Magic Source
  • Section 1 Tunnel: W-Item Materia & Save Point

Enemies in the tunnels also drop Turbo Ethers and Phoenix Downs, so worth the trip.


Head back the way you came but prepare for a Boss fight. When you reach the tunnel you came in through, start to head onwards. The Turks will arrive, you have the option to fight them or not. If you fight them it is against Reno, Rude & Elena, each has an item to steal.


Tip: Link a Steal As Well Materia to a magic that can attack all enemies (Ultima for example) so you can steal from all enemies at once.

Tips:


Each absorbs a certain element; try to not use fire, ice or lightning so you don't accidentilly heal one of them.

[Reno = Lightning, Rude = Fire & Elena = Ice]


If you defeat one Turk, the others will run away. Watch their HP then hit them with an attack that will take out all 3 at once.


Elena moves between the back and front rows, making her difficult to hit with physical attacks unless you use Long Range.


Cast Wall (or Big Guard), Haste and Regen ASAP at the start.

Boss Fight: Reno (Level: 50), Rude (Level: 51) & Elena (Level: 53)

Statistics
HP MP Attack Mag
Attack
Def Mag
Def
Dex
25,000
28,000
30,000
200
250
100
100
110
75
105
83
100
120
130
90
106
190
190
80
70
85
Elemental Affinity
Fire Ice Lightning
-100% * -100% * -100% *
Earth Poison Gravity
100% 100% 0%
Water Wind Holy
100% 100% 100%
Rewards
Items Gil EXP AP
Elixir (Consumable Item)
None
3000
5000
7000
4500
5500
6400
450
600
800
Other Details
Morph Attacks Steal
None Reno: Electroprod, Short Staff & Turk Light
Rude: Grand Spark & Shoulder Attack
Elena: Bewildered, Kick & Throw
Reno: Tough Ring (Accessory) (51%)
Rude: Ziedrich (Armour) (51%)
Elena: Minerva Band (Armour) (51%)

FF7 Sector 8 Sister Ray Tower

After the fight (If you did it), head north. At the fork, you can either go left straight to the Sister Ray or you can go right, then left to Shinra HQ to collect a few things:

  • Floor 64 (Locker Room, rear locker): HP Shout
  • Floor 63 (Room in the middle): Glow Lance
  • Rear Stairs (Floor 59, head down the stairs, 4th set of stairs): Behemoth Horn
  • Floor 2 Gift Shop (Chests at the back): Pile Bunker & Master Fist

Head back to the first fork and head left to the Sister Ray. Prepare for a Boss fight. 


When you come out of the tunnel, climb the structure in front of you, then start to head north. The Boss fight will start after taking a few steps north.


Once done with the Boss, continue north to (2).

Tips:


This Boss has 2 parts; the main body and the Jamar Armor on its chest. The Jamar Armor has no attacks but allows Boss to use Materia-Jammer.


Regen and Wall (or Big Guard) will help with HP loss.


Attacks that hit both targets such as 2x Cut, spells with All and Summons will help to reduce Boss and Jamar Armor at the same time.


Boss is very defensive, battle can become drawn out.


Big Hand Clash, Wrist Laser, Knee Fire, Knee Blend and W Machine Gun can be used twice per turn; keep an eye on HP.

Boss Fight: Proud Clod (Level: 53) with Jamar Armour (Level: 62)

Statistics
HP MP Attack Mag
Attack
Def Mag
Def
Dex
60,000
20,000
320
300
102
130
120
109
170
200
300
330
88
110
Elemental Affinity
Fire Ice Lightning
100% 100% 100%
Earth Poison Gravity
100% 100% 0%
Water Wind Holy
100% 100% 100%
Rewards
Items Gil EXP AP
Ragnarok (Weapon)
None
10,000
10,000
7000
8000
1000
1500
Other Details
Morph Attacks Steal
None Standing: Big Hand Clash, Knee Blens, Knee Fire, Materia-Jammer, W Machine Gun & Wrist Laser
Charging: Beam Cannon
None

Sister Ray:


[Items to find: Mystile, Elixir, Missing Score]


In the next room there are 2 chests containing Mystile (A) and an Elixir (B). There is also a Save Point if you need it and stairs leading up to the Sister Ray.


Prepare for a long Boss fight and if you want to get Barret's Ultimate Weapon (Missing Score), he needs to be in your party for the chest (C) to appear on the next screen.


Continue up the stairs and head to the right to the control point.


Tip: The next Boss is split into 3 parts, so a general setup that will be useful is:

  • Ribbons on party or Added Effect linked with Hades on Armour to negate status effects of stage 2 of the Boss.
  • DeathBlow Command.
  • Enemy Skill Materia with Big Guard, Magic Breath and White Wind.
  • Adding Cover and Counter-Attack Materia is useful to allow your strongest character to cause damage for every Boss attack; but mostly useful against 3rd Form.

Tips:


Boss is first part of a three-part Boss fight.


Boss has no attacks but summons aid via Capsule; these monsters should be ignored as they will just be summoned again.


Do not waste MP on this form; hit with physical attacks and DeathBlow.


If the monsters are a pain, you can cause Stop on them and keep hitting Hojo.

Boss Fight: Hojo (Level: 50)

Statistics
HP MP Attack Mag
Attack
Def Mag
Def
Dex
13,000 250 60 60 130 150 78
Elemental Affinity
Fire Ice Lightning
100% 100% 100%
Earth Poison Gravity
100% 100% 0%
Water Wind Holy
100% 100% 100%
Rewards
Items Gil EXP AP
None 0 0 0
Other Details
Morph Attacks Steal
None Capsule None

Tips:


Boss has 3 points of attack; the Main body, the Left Arm and the Right Arm. The arms are needed for Boss to use Bio Gas and Confu.


The arms can be ignored for battle but taking them out will stop certain attacks (Right arm allows the Boss to use Pile Banger).


The Boss is mostly status effect based, equip Ribbon, Added Effect and Hades Materia linked on Armour will stop the status effects.

Boss Fight: Helletic Hojo (Level: 55)

(Body, Left Arm & Right Arm)

Statistics
HP MP Attack Mag
Attack
Def Mag
Def
Dex
26,000
24,000
5000
200
400
300
80
46
150
60
100
80
140
150
120
200
150
130
68
90
95
Elemental Affinity
Fire Ice Lightning
100% 100% 100%
Earth Poison Gravity
100% 100% 0% *
Water Wind Holy
100% 100% 100%
Rewards
Items Gil EXP AP
None 0 0 0
Other Details
Morph Attacks Steal
None Bio Gas, Confu, Pile Banger, Silence & Sleepel None

(*) Right Arm is able to be damaged by Gravity, but it is not worth wasting time on it as it is weak anyway)

Tips:


Similar to previous forms; a lot of the attacks cause status effects, so the Ribbon(s) and Hades-Added Effect Materia will be useful here.


Boss uses a "Combo" attack against the last character to hit them; the number of hits changes and can cause a status effect on final hit (2 Hit = Poison, 3 Hit = Darkness, 4 Hit = Sleep).


Silence is used as a counter-attack against a character who uses magic against Boss.


Having a character with Cover and Counter-Attack will allow you to hit the Boss back for every Combo attack.


Reduce Boss MP with Magic Hammer to keep Boss from using other attacks and make him use Combo.

Boss Fight: Lifeform-Hojo N (Level: 58)

Statistics
HP MP Attack Mag
Attack
Def Mag
Def
Dex
30,000 100 100 90 120 180 100
Elemental Affinity
Fire Ice Lightning
100% 100% 100%
Earth Poison Gravity
100% 100% 0%
Water Wind Holy
100% 100% 100%
Rewards
Items Gil EXP AP
Power Source (Consumable Item) 6000 25,000 2500
Other Details
Morph Attacks Steal
None Absorb, Combo, Silence & Slow None

After the battle, a few scenes will play where Cloud and the others discuss why they are doing this. You all agree to go off and try to discover their personal reason for doing this and meet up again.

Once back on the Highwind, Cid will bust out the boosters making the Airship fly faster and you will head to Northern Crater. This concludes the second disc.

End of Disc 2


Disc 3

FF7 Northern Crater Entrance Path

Northern Crater:


[Items to find: Save Crystal, Guard Source (3), Power Source (2), HP Absorb Materia, Elixir (3), Magic Source (2), Mind Source (2), Hero Drink (2), Megalixir (3), Remedy (2), X-Potion (2), Vaccine (2), Turbo Ether (2), Magic Counter Materia, Mega-All Materia, Speed Source (2), Shield Materia, Imperial Guard, W-Magic Materia, Counter Materia, Mystile, Tetra Elemental]


Upon arriving, climb down the ladder from the Highwind and head south. On the next screen select "Alright, let's go!" to enter the crater.


After making your way down into the crater, you arrive at a spiral path downwards.


There is a cave here (1) which leads out to the top of the crater if you need to leave and a chest (A) with a Save Crystal (Save this for later).


Continue down the spiral path, jumping across the gaps and collect the Guard Source from the chest (B). Continue downwards.


This next part has you jumping up and down to ledges.


First, head left and jump off the ledge you are on then climb up the ledge to the left. Open the chest (C) to get a Power Source then head right (While still on the platform), behind the wall to get the HP Absorb Materia (D).


Now jump off the platform  and head south-east to the platform below with another chest (E) with an Elixir.


Continue down and collect the chest (F) with a Magic Source. Before leaving via (3), climb up to the top and then down the right to get the last chests; (G) Mind Source & (H) Guard Source.


Now exit at the bottom.

FF7 Northern Crater Part 2

The next area is a maze of jumps and caves; jump from the starting platform and head left into the cave (1). Inside, head right and down where there is a cave (2) which leads to a chest (A) with a Power Source.


Head down to the bottom, grab the chest (B) with a Guard Source and leave via the exit (3).


To the right of the exit is a chest (C) with a Hero Drink. From here, you can't progress, so head back to the top.


At the top, head right until you jump off the ledge, collect the chest (D) with a Mind Source then climb up to the ledge above and left to the cave (4), inside is a chest with a Megalixir. Exit behind you and climb back up to the ledge above and head right.


Go right and jump to the next platform below. Enter the cave (5) and follow the path right, down then left and exit (6).


Finally, make your way down to the exit at the bottom (7).

FF7 Northern Crater Split

The rest of the party are here now and the path splits; both ways have items to collect and you can choose who goes which way. The characters you choose will grab certain items so you have the chance of getting 2 of each item but some will be missed as you can only send them one way.


The table to the right shows what each character can get and below, I will make choices that I believe to be of the most benefit.


Initially, send Tifa Right and everyone else Left. Choose your party and head left where you will need to split up again; send your party as follows:

  • Cloud: Down
  • Barret: Down
  • Cait Sith: Down
  • Cid: Up
  • Red XIII: Up
  • Vincent: Down
  • Yuffie: Up

Anyone who goes down with Cloud can be party members but they are probably not part of your usual party, so take some time to equip them with Weapons, Armour and Materia. Head down.


Head down and collect the chest (A) with a Remedy. Head right, then up and collect the chest (B) with an Elixir.


Head back and then down to collect the chest (C) with an X-Potion. Continue heading down and leave via the exit (1).


Head down, jumping from platform to platform and jump off the left side. Head right and collect the chest (D) which is a Vaccine, and continue down and around to the other chest (E) which is a Turbo Ether. This is also where you can climb back up if you need to (X).


Climb up and jump off to the left again, continue left and collect the item floating off the ledge, it is a Magic Counter Materia (F)


Continue down to exit (2).


Jump down and collect the chest (G) which is an X-Potion. Head left and follow the path down where there is another chest (H) with a Turbo Ether. Head left and on a platform is a Materia (I) - Mega-All, to get it, you must press (OK) as you land as you will automatically jump to the next platform where a chest is (J) with a Speed Source.


Once you have both these final items, head back to the main platform and head down to the exit (3).

FF7 Northern Crater Final Descent

You will emerge in a round room from door (1). There is a chest (A) with a Luck Source and some steps leading down, don't approach the stairs yet..


At this point, it is best to go back go to the other paths to get the items from there.


If you don't want to go back to get the items in the other paths or don't want to do anything other than finish the game, head to (X) and click here to skip the next section.

Character Right Path Left & Upper Path Left & Lower Path
Barret Guard Source Vaccine Remedy
Cait Sith Elixir Remedy X-Potion
Cid Speed Source Imperial Guard Elixir
Red XIII Mind Source Shield Materia Speed Source
Tifa Mysile Hero Drink Turbo Ether
Vincent Megalixir Magic Source Mega-All Materia
Yuffie Megalixir Counter Materia Vaccine
FF7 Northern Crater Upper Path

Head back to the top of the lower path and you can now go to the upper path where you sent Cid.


This area has water and what look like roots to walk on. Firstly, head down and follow the path to get to chest (A) which is a Magic Source


Head back then head up and right, you will go under the water and emerge the other side and head up then left towards the other chest (B) which is a Remedy


Exit the room at the far right (1).


Head right along the path then turn left, there is a fork in the path, the left one leads to a chest (C) with a Vaccine


There is a ledge you can climb that leads to a Shield Materia (D) and  if you keep walking south from the Materia you will go under the water to the chest (E) with an Imperial Guard.


From the chest, head down and under the water to the other side of the room.


Head left and down to the other chest (F) which is a Hero Drink


Now, head back up the slope you came from and exit the area on the far right (2).

FF7 Northern Crater Upper Path exit

In this room, there are a couple of Materia to get, (A) is W-Magic Materia and (B) is Counter Materia.


If you exit via (X) it will lead back to the room with the stairs but there is another path to go through, so head back to the first time you split up and sent Tifa right, head right now yourself.


Head down the spiral pillar and at the bottom choose "Go down".


Here there is a chest and an item, collect both for a Mystile and an Elixir.


Continue down the spiral path to reach the very bottom.

FF7 Northern Crater Right Pa

At the bottom, collect the first chest (A) which is a Speed Source. Head south to another chest (B) with a Tetra Elemental.


Head to the right, the north and then left to get another chest (C) with a Megalixir. Head back then north to the exit, grab the chest (D) with another Megalixir. Leave via the exit (1).


Head down the final spiral path and exit at the bottom into the final room with the steps leading down.


To get the items from your other party members, head to the steps and they will all arrive and you can talk to Tifa, Cid, Red XIII & Yuffie to get their items (Mystile, Imperial Guard, Shield Materia & Counter Materia respectively).


Do not go down just yet, head left, past Cid to exit this screen and use the Save Crystal to create a Save Point here.


Anything Else?:

If you want to go on to the final area, skip to the next section. If you still wish to do other things, head back up the way you came, all the way to the top and enter the cave at the top then climb the rocks to the right to get back to the Highwind.

There are a number of things left to do:
All of the above is optional but is recommended if you want the full experience of the game and there are some nice rewards. Once done, head back to Northern Cave and head down to the bottom where you created your save point.

FF7 Northern Crater - Finale

Final Encounter:


After you have saved, equip your team (Equip Everyone with their best Weapons, Armour and Accessory and give them some Materia as you may need it).


Move towards the steps leading down and choose "Let's Get Going". Select your team and head down.


Tip: Do not use Knights of the Round against JENOVA-Synthesis as it will cause the next Boss' to have increased HP. 

Tips:


Do not use Knights of the Round.


The tentacles have 10,000HP and 8,000HP so can be taken out quickly but will be revived to 25%.


Shadow Flare and Pandora's Box Enemy Skills are very good against Boss.


Once the Tentacles are removed, hit the Boss with your strongest attacks (Except KotR).


When Boss is under 15,000HP, a countdown will start and when it reaches 0 the Boss will use Ultima. If Boss uses Ultima, you will not get rewards from Boss and fight will end. (If tentacles were defeated, you will get EXP and AP from them).

Boss Fight: Jenova-SYNTHESIS (Level: 61)

Statistics
HP MP Attack Mag
Attack
Def Mag
Def
Dex
60,000 600 150 120 50 90 120
Elemental Affinity
Fire Ice Lightning
100% 100% 100%
Earth Poison Gravity
0% -100% 0%
Water Wind Holy
100% 100% 100%
Rewards
Items Gil EXP AP
None 0 60,000 500
Other Details
Morph Attacks Steal
None Absorb, Bio2, Cure3, Repeating Slap, Stop & Ultima None

Following the fight against JENOVA-Synthesis, the ground will start the crumble and you will fall. When you wake up, you will be with the rest of the party and Sephiroth will appear.


Note: The next 2 fights are one after another and there are factors determining how the first Boss fight will work; you can face the next Boss with either 1 party, 2 parties or 3 parties:

One Party Scenario:


Must meet one of the following conditions:


  • Jenova∙SYNTHESIS achieved 13 turns or more before the Ultima countdown was activated.


  • The lowest levelled character in the player party is level 34 or lower. This does not count Aeris, and does not count Yuffie and/or Vincent if the player has not obtained them.


  • The average party level is 53 or less. This does not count Aeris, and does not count Yuffie and/or Vincent if the player has not obtained them.

Two Party Scenario:


Must not meet any of the conditions for One Party, then one of the following conditions:


  • Either Yuffie, Vincent, or both are not obtained.


  • The lowest levelled character in the player party is level 44 or lower. This does not count Aeris, and does not count Yuffie and/or Vincent if the player has not obtained them.


  • The average party level is level 67 or lower. This does not count Aeris, and does not count Yuffie and/or Vincent if the player has not obtained them.

Three Party Scenario:


Must not meet any of the conditions for One or Two Party, then all of the following conditions:


  • Both Yuffie and Vincent are obtained.


  • Jenova∙SYNTHESIS achieved 12 turns or fewer before the Ultima countdown is activated.


  • The lowest levelled character in the player party is 45 or higher. This does not count Aeris.


  • The average party level is 68 or higher. This does not count Aeris.

Additionally, the amount of HP the Boss has will depend on how many characters are level 99; this applies to the one party battle and the main battle in the 2 and 3 party battles:

Body part Base HP Modifiers
Main Body 40,000 + 5,000 for each character at L99 + 60,000 if Knights of the Round was used on Jenova∙SYNTHESIS
Head 2000 + 250 for each character at L99
Core 10,000 + 1,250 for each character at L99
Right Magic 4,000 + 500 for each character at L99
Left Magic 4,000 + 500 for each character at L99

This means the minimum amount of HP the Boss will have is 60,000HP up to a maximum of 180,000HP. (Single Party stats only; 2 and 3 party will have more collective HP)


If you have beaten both Emerald and Ruby Weapon at this point, this should be easier.

Tips:


The Boss is split into parts; Head, Body, Core, Left Magic and Right Magic; The core is invincible while the Magics are alive and uses Bizarro Energy to restore 6000HP to the body each turn.


The Left Magic absorbs Fire & Earth Magic while the Right Magic absorbs Ice & Lightning.

Boss Fight: Bizarro-Sephiroth [1 Party] (Level: 61)

Statistics
HP MP Attack Mag
Attack
Def Mag
Def
Dex
60,000+ 2000 210 144 400 400 100
Elemental Affinity
Fire Ice Lightning
-100% * -100% * -100% *
Earth Poison Gravity
-100% * 100% 0%
Water Wind Holy
100% 100% 100%
Rewards
Items Gil EXP AP
None 0 0 0
Other Details
Morph Attacks Steal
None Aurora Fence, Bizarro Energy Bolt3, Demi3, Fire3, Heartless Angel, Ice3, Quake3, Sephiroth Shock, Slow, Stigma & Stop None

Knights of the Round is very effective; if used with W-Summon it can take out the Boss in 1 turn.


When the Head and Core are alive; the body can attack the party with Stigma which causes Poison and Slow and attack a single character with Sephiroth Shock.


If the Core is dead and the Head is alive, the Body can use Heartless Angel which reduces party HP to 1.


High level Summons and magic like Ultima will be effective if you don't have KotR.


Boss is defeated when the Body is destroyed; so focus on the body.


Tips:


The Boss is split into parts; Main Head, Main Body, Main Core, Right Shoulder, Right Arm, Left Shoulder, Left Arm, Sub Body, Sub Head and Sub Core; The cores are invincible while the Arms and Shoulders are alive and uses Bizarro Energy to restore 6000HP to the body each turn.

Boss Fight: Bizarro-Sephiroth [2 Party] (Level: 61)

Statistics
HP MP Attack Mag
Attack
Def Mag
Def
Dex
125,000+ 4000 210 144 420 420 120
Elemental Affinity
Fire Ice Lightning
-100% -100% -100%
Earth Poison Gravity
100% 100% -100%
Water Wind Holy
100% 100% 100%
Rewards
Items Gil EXP AP
None 0 0 0
Other Details
Morph Attacks Steal
None Main: Aurora Fence, Bizarro Energy, Bolt3, Heartless Angel, Ice3, Sephiroth Shock, Sleepel, Slow & Stigma
Sub: Aurora Fence, Bizarro Energy, Demi3, Fire3, Heartless Angel, Quake3, Sephiroth Shock, Stigma & Stop
None

The Left arm and shoulder absorb Fire & Gravity magic while the Right arm and shoulder absorb Ice & Lightning.


The 2 parties are split between the left and right sides of the Boss and you can switch between parties during the battle.


Knights of the Round is very effective; if used with W-Summon it can take out the Boss in 1 turn.


When the Head and Core are alive; the body can attack the party with Stigma which causes Poison and Slow and attack a single character with Sephiroth Shock.


If the Core is dead and the Head is alive, the Body can use Heartless Angel which reduces party HP to 1.


High level Summons and magic like Ultima will be effective if you don't have KotR.


Boss is defeated when the Body is destroyed; so focus on the body.


Tips:


The Boss is split into parts; Main Head, Main Body, Main Core, Right Magic, Left Magic, Sub Head Left, Sub Body Left, Sub Core Left, Left Shoulder, Left Arm, Sub Head Right, Sub Body Right, Sub Core Right, Right Shoulder & Right Arm; The cores are invincible while the Magics, Shoulders and Arms are alive and they use Bizarro Energy to restore 6000HP to the body each turn.

Boss Fight: Bizarro-Sephiroth [3 Party] (Level: 61)

Statistics
HP MP Attack Mag
Attack
Def Mag
Def
Dex
197,000+ 6000 210 144 400 400 100
Elemental Affinity
Fire Ice Lightning
-100% * -100% * -100% *
Earth Poison Gravity
-100% * 100% 0%
Water Wind Holy
100% 100% 100%
Rewards
Items Gil EXP AP
None 0 0 0
Other Details
Morph Attacks Steal
None Main: Aurora Fence, Bizarro Energy, Bolt3, Demi3, Fire3, Heartless Angel, Ice3, Quake3, Sephiroth Shock & Stigma
Left: Aurora Fence, Bizarro Energy, Demi3, Fire3, Heartless Angel, Quake3, Sephiroth Shock, Stigma & Stop
Right: Aurora Fence, Bizarro Energy, Bolt3, Heartless Angel, Ice3, Sephiroth Shock, Sleepel, Slow & Stigma
None

The Left Magic, Right Magic & Right Shoulder absorb Ice & Lightning and the Left Shoulder & Left Arm absorbs Fire & Earth.


The 3 parties are split between the left side, right side and Cloud's team in the center of the Boss and you can switch between parties during the battle.


Knights of the Round is very effective; if used with W-Summon it can take out the Boss in 1 turn.


When the Head and Core are alive; the body can attack the party with Stigma which causes Poison and Slow and attack a single character with Sephiroth Shock.


If the Core is dead and the Head is alive, the Body can use Heartless Angel which reduces party HP to 1.


High level Summons and magic like Ultima will be effective if you don't have KotR.


Boss is defeated when the Body is destroyed; so focus on the body.


The final Boss is fought immediately after this one; Safer-Sephiroth. Like with Bizarro-Sephiroth, his stats increase depending on previous battles:
  • For every character at Level 99 (not counting Aeris),Safer-Sephiroth's stats increase: 30,000 HP, 2 Attack, 20 Defence, 5 Magic Attack, and 16 Magic Defence.
  • If Knights of the Round was cast on Jenova∙SYNTHESIS, Safer∙Sephiroth gains an extra 80,000 HP.
  • For every time Bizarro∙Sephiroth's head was killed during the previous fight, Safer∙Sephiroth's maximum HP is reduced by 100, up to a maximum reduction of 24,900 HP.
Tip: Do not try to outlast him through MP drains or waiting for his MP to run out; his MP is fully restored before each of his turns.

Another annoyance is he will rise into the air, making him a Long-Range target.

Tips:


The final challenge of the game; Boss uses attacks in a pattern:

  1. Wall or DeSpell (Alternates)
  2. Deen (If DeSpell used) or Shadow Flare
  3. Physical Attack
  4. Boss flies up, becomes Long Range
  5. Pale Horse
  6. Super Nova
  7. Break (If over 25% HP) or Heartless Angel (If under 25% HP)
  8. Returns to original position.

Boss Fight: Safer-Sephiroth (Level: 87)

Statistics
HP MP Attack Mag
Attack
Def Mag
Def
Dex
55,100+ 680 230* 100* 100* 180* 160
Elemental Affinity
Fire Ice Lightning
100% 100% 100%
Earth Poison Gravity
0% 100% 0%
Water Wind Holy
100% 100% 100%
Rewards
Items Gil EXP AP
None 0 0 0
Other Details
Morph Attacks Steal
None Break, Deen, DeSpell, Heartless Angel, Pale Horse, Shardow Flare, Super Nova & Wall None

Boss can not run out of MP; MP is replenished every turn.


Boss is immune to Earth and Gravity magic.


Knights of the Round is a good summon along with Bahamut Zero, LIMIT BREAKS like Omnislash, and Ultima Magic are all good choices. Hit hard and hit fast.


After the battle, a scene plays and you will enter one final battle. This is impossible to lose, your LIMIT meter will rise quickly and one use of Omnislash will defeat Sephiroth once and for all.

Another scene will play, showing the Planet fighting against Meteor.

End of Game

Share by: